Making of: the piano room
Table of contents
Jump in this page to: armchairs, carpet. piano, curtains, the room, electrical monitoring system, table cloth on the piano, chairs, flowers or other objects.
About the textures
If the modeling of the objects is not too detailed for you, as described until now, then the shaders I'll present will definitely exceed expectations :).
for the majority of objects I had to texture, I have very complex stacked shaders in most of the channels. I rarely have simple coloured channels. I even created "preset"-like shaders which consisted of tons of noises and shaders stacked in a Layer shader, which I used wherever I wanted to have a given channel seem more random. I also like to do, as much as possible, all the texture details from shaders, not to paint them in Photoshop. This allows me to render at any resolution. I use Photoshop to paint decals or any other things which I can't really achieve through shaders.
Another important aspect is that in this scene I used very dim reflections which are really glossy, and they all have a low Fresnel index. Besides this, for most of the shaders, I used one specularity channel for the reflections and another one for the actual specularity.
Furthermore, whenever you see a spot of dirt or splatter on the walls, piano or any other object, it's not just the colour / diffuse channel which is textured this way, but it's also the reflections channel and the bump channel. Thus, all my texture shaders are also found in the bump channel and/or specularity channels. I tried to reproduce the real phenomena of dirt adding almost unnoticeable bump and reducing reflections and specularities.
All these general aspects lead to a really major problem - I'll write about this in the next chapter: rendering. Those who are really into 3D might already guess what the issue is. But for now, I'll continue with the article by showing you the most important shaders.
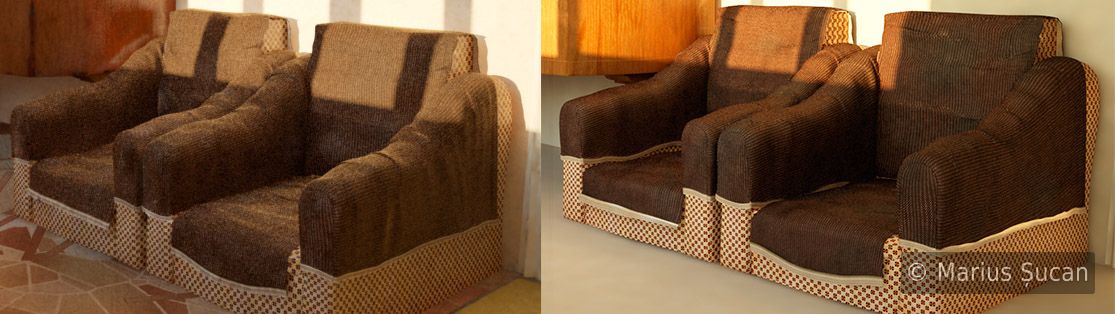
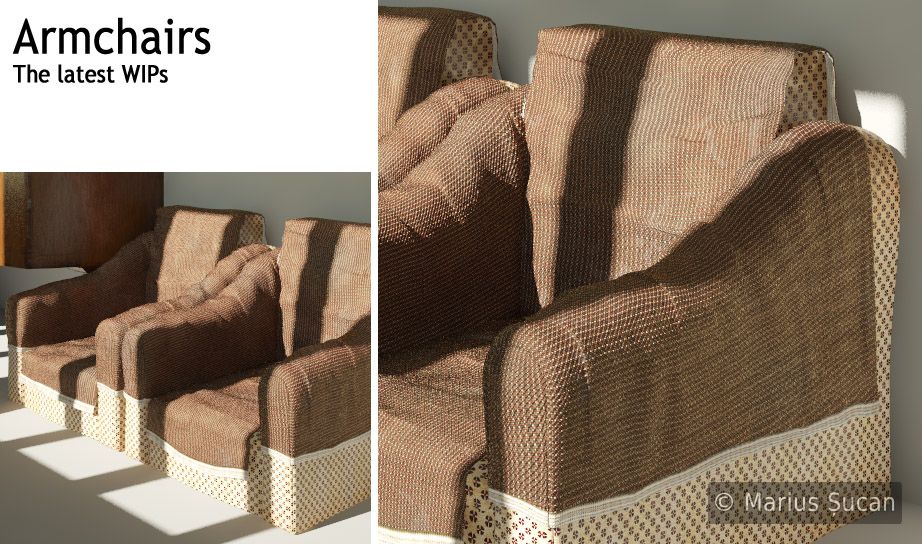
Armchairs
For the armchairs, after completing them, I had to prepare the UV maps. In the entire scene, I had to generate good UV maps just for the piano corpus/base object and the armchairs. I used Bodypaint's UV relax tools to do it and, I must say, it was boring, annoying and it took a long time to finish it.
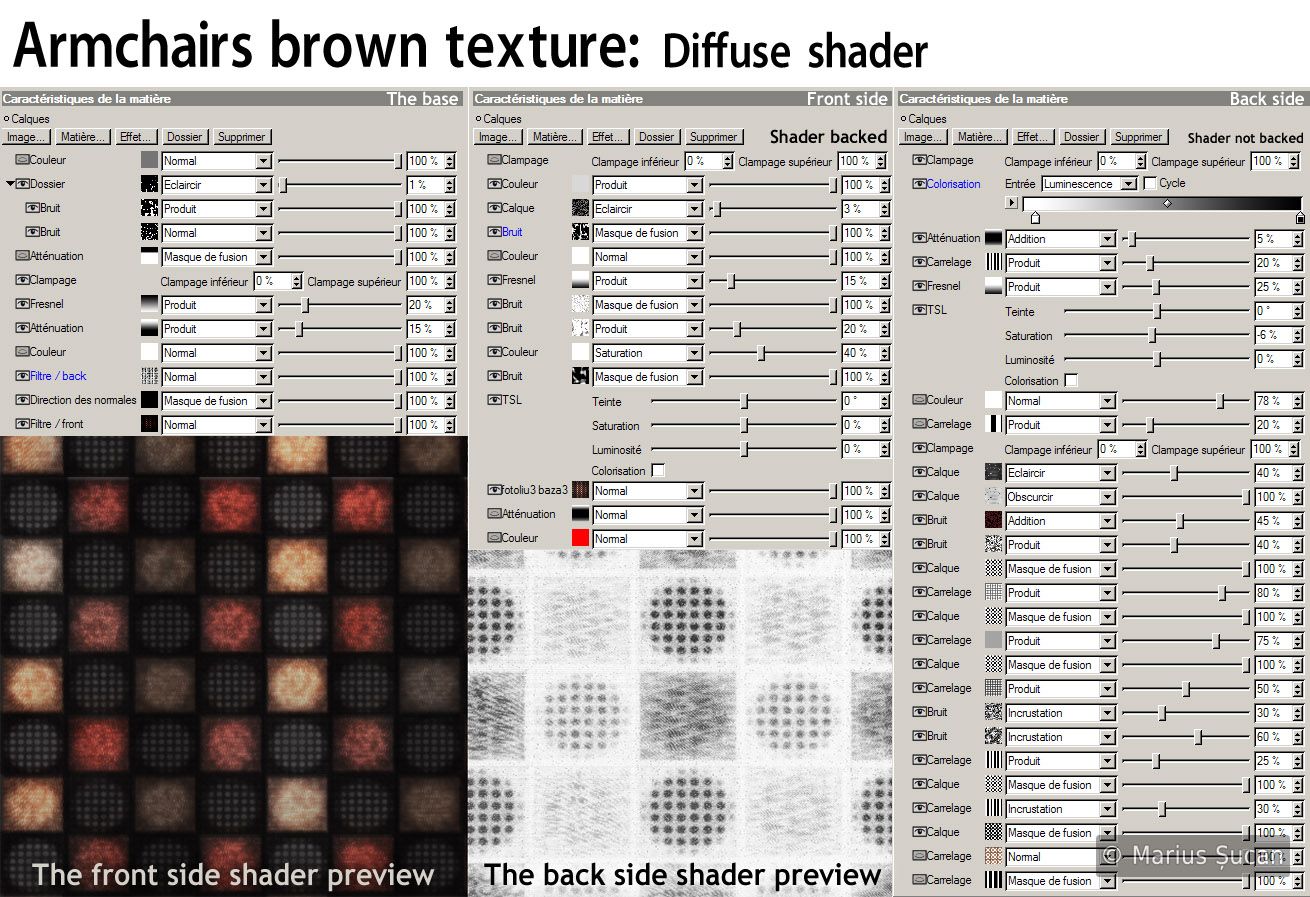
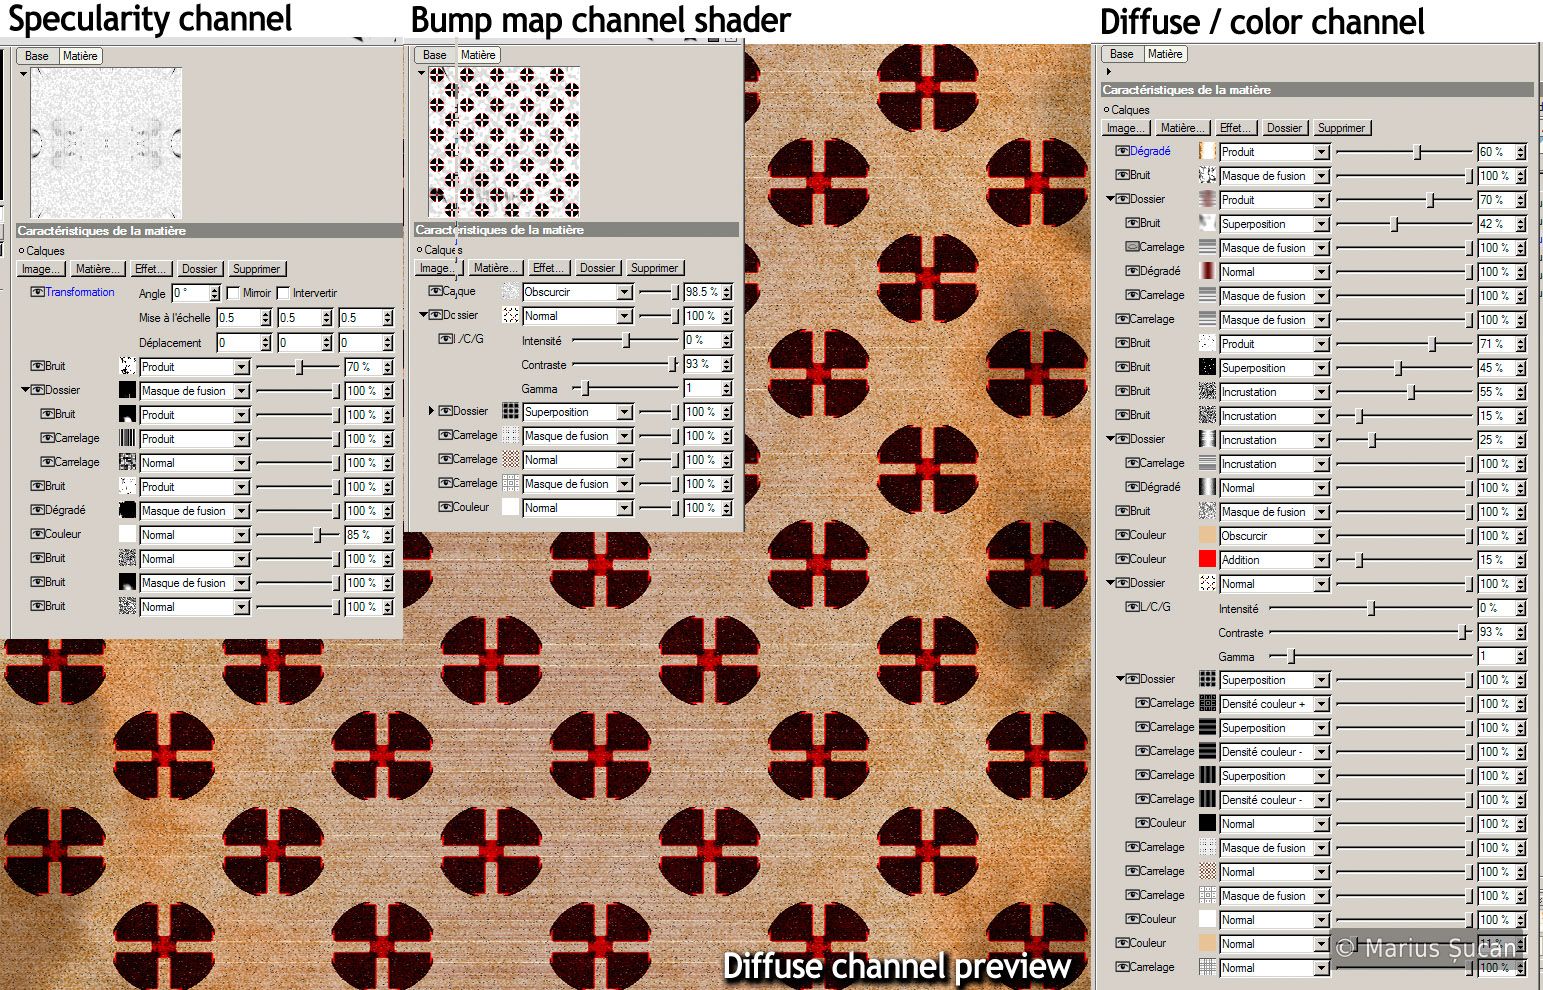
The shader is very complex, as most of my shaders and, as such, it must be presented systematically. In the diffuse channel, I have a Layers shader structured as this: several layers to get the desired shadings and colour grading, the texture for the front side of the normals, the shader for the back side of the normals. I used the Normals shader as a mask to have a different texture for the back side of the cover on the armchairs. The next image is shows the structure:
One particularly interesting aspect about this shader is that I wasn't able to get the exact pattern I wanted using C4D's shaders, as such, I had to bake the shader and do a fairly minor adjustment in Photoshop. You may already notice that I like to use many shaders to get to the pattern I want. I used multiple types of Tile shaders and many noise shaders to add variety, details. Despite the efforts to get it all in C4D, in the following image, you can see the original shader and the Photoshop adjusted one:
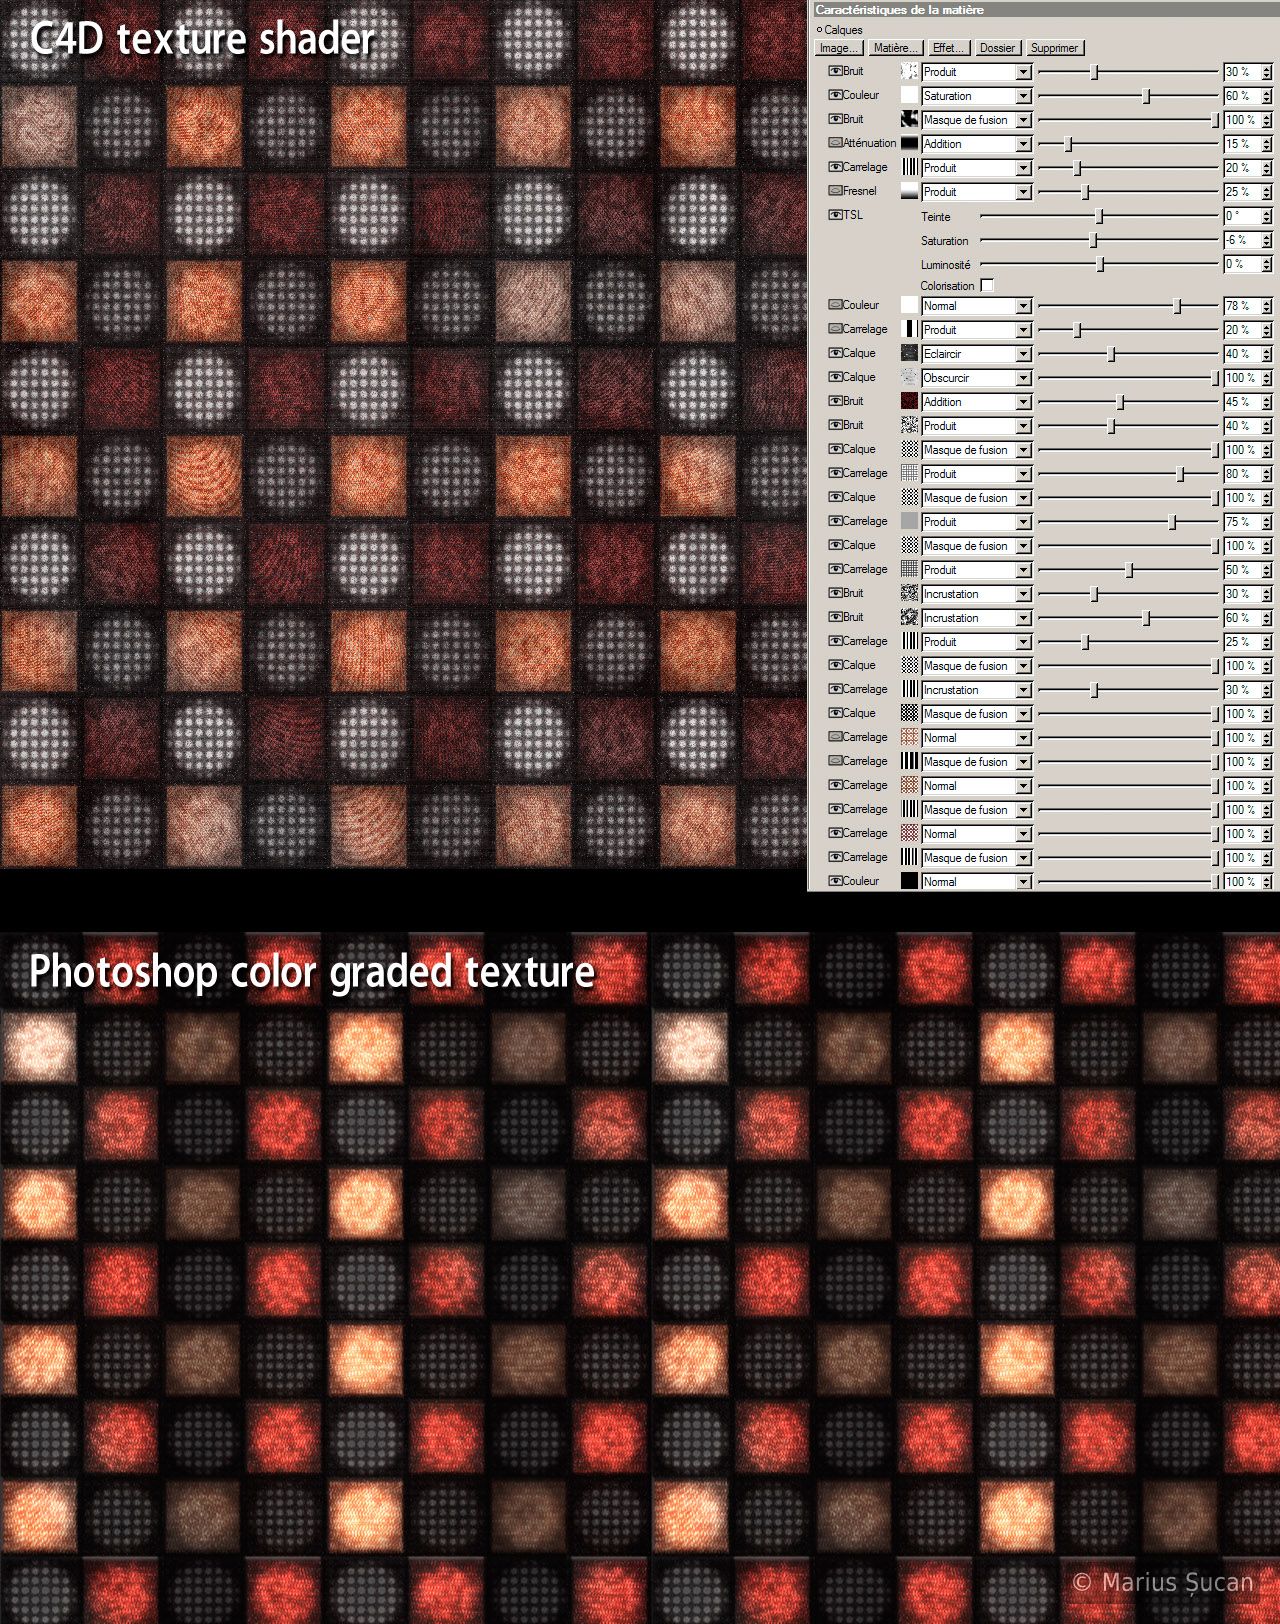
It is somewhat difficult to obtain the same colours and the same pattern with C4D. In Photoshop it was trivial to make the easy to be noticed pattern of vertical lines to repeat properly: yellow, red, dark and red. I couldn't get this pattern of vertical lines within C4D, even if I tried a lot,
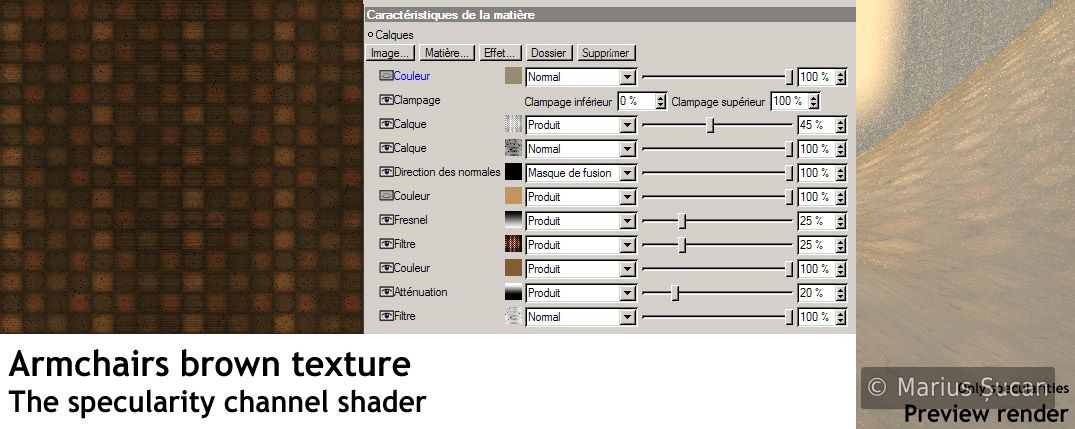
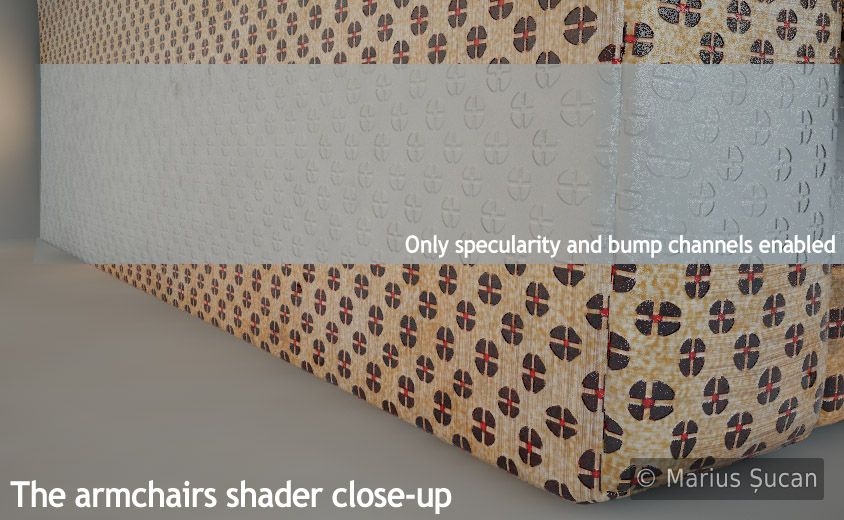
I defined two specularity channels pretty much the same: a shader for the front of the normals and another for the back, relatively the same amount of complexity for both, as seen before. The bump map is also a complex shader, but I'd say more simple. For curiosity's sake, I rendered two images which show how the surface looks like with the specularity channels enabled, the other one with the bump channel only, both being close-ups. For the final renders, I baked the bump map, to speed up renders.

I have two specularity channels because I wanted to get a particular shading for the armchairs. I observed in real life some reflections on their surfaces that I tried to capture in this way. You can notice the missing reflections in the image on the right side of the following image which shows this aspect:
I also added details to the surface using SPD. The bump and the SPD shaders are relatively the same. I rendered a close-up to show these details:

Here are the two last WIP images of the armchairs:
Until now, I presented the shader for the cover of the armchairs. Now, the two armchairs themselves are having a simpler shader. I don't take in consideration the back side of the normals, of course. The following image is a close-up of the base of the two armchairs which shows, in section, how the shader looks like without the colour channel, so that one is able to observe the bump and specularity channels. I also added a big preview of the colour/diffuse channel, along the shaders list of each channel.
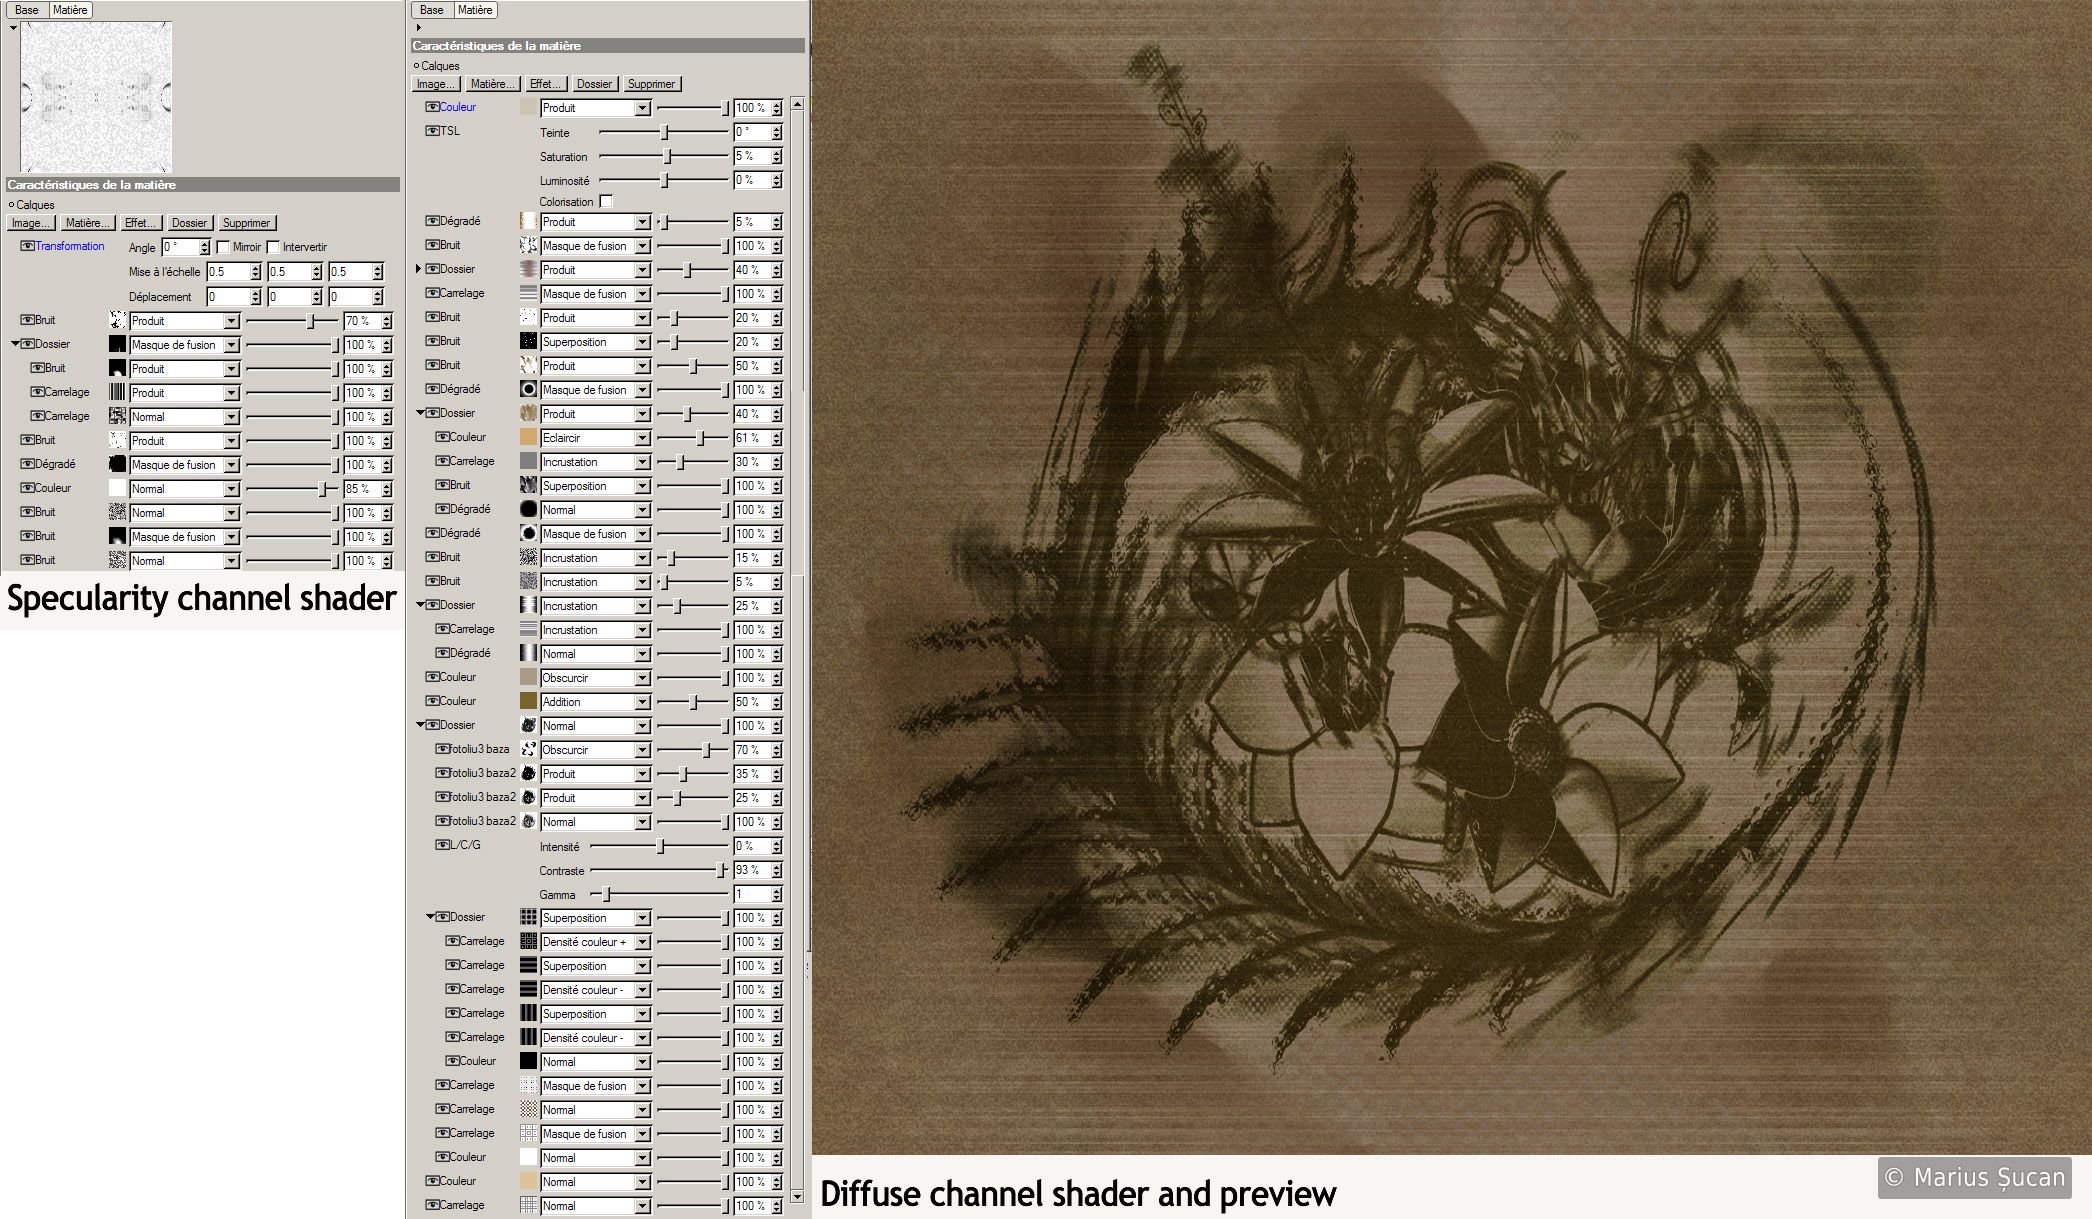
The third armchair, placed in the front of the windows, visible in the third final render, has the same type of sheet cover. But, the base is textured differently. I used a floral motif as it is in reality. The flowers were made with xFrog for "The wind of change" project I did some years ago. I rendered them with "Sketch and Toon" and post-processed the output a bit more in Photoshop. In 3D, the shader is very similar to the shader used for the base of the other two armchairs.


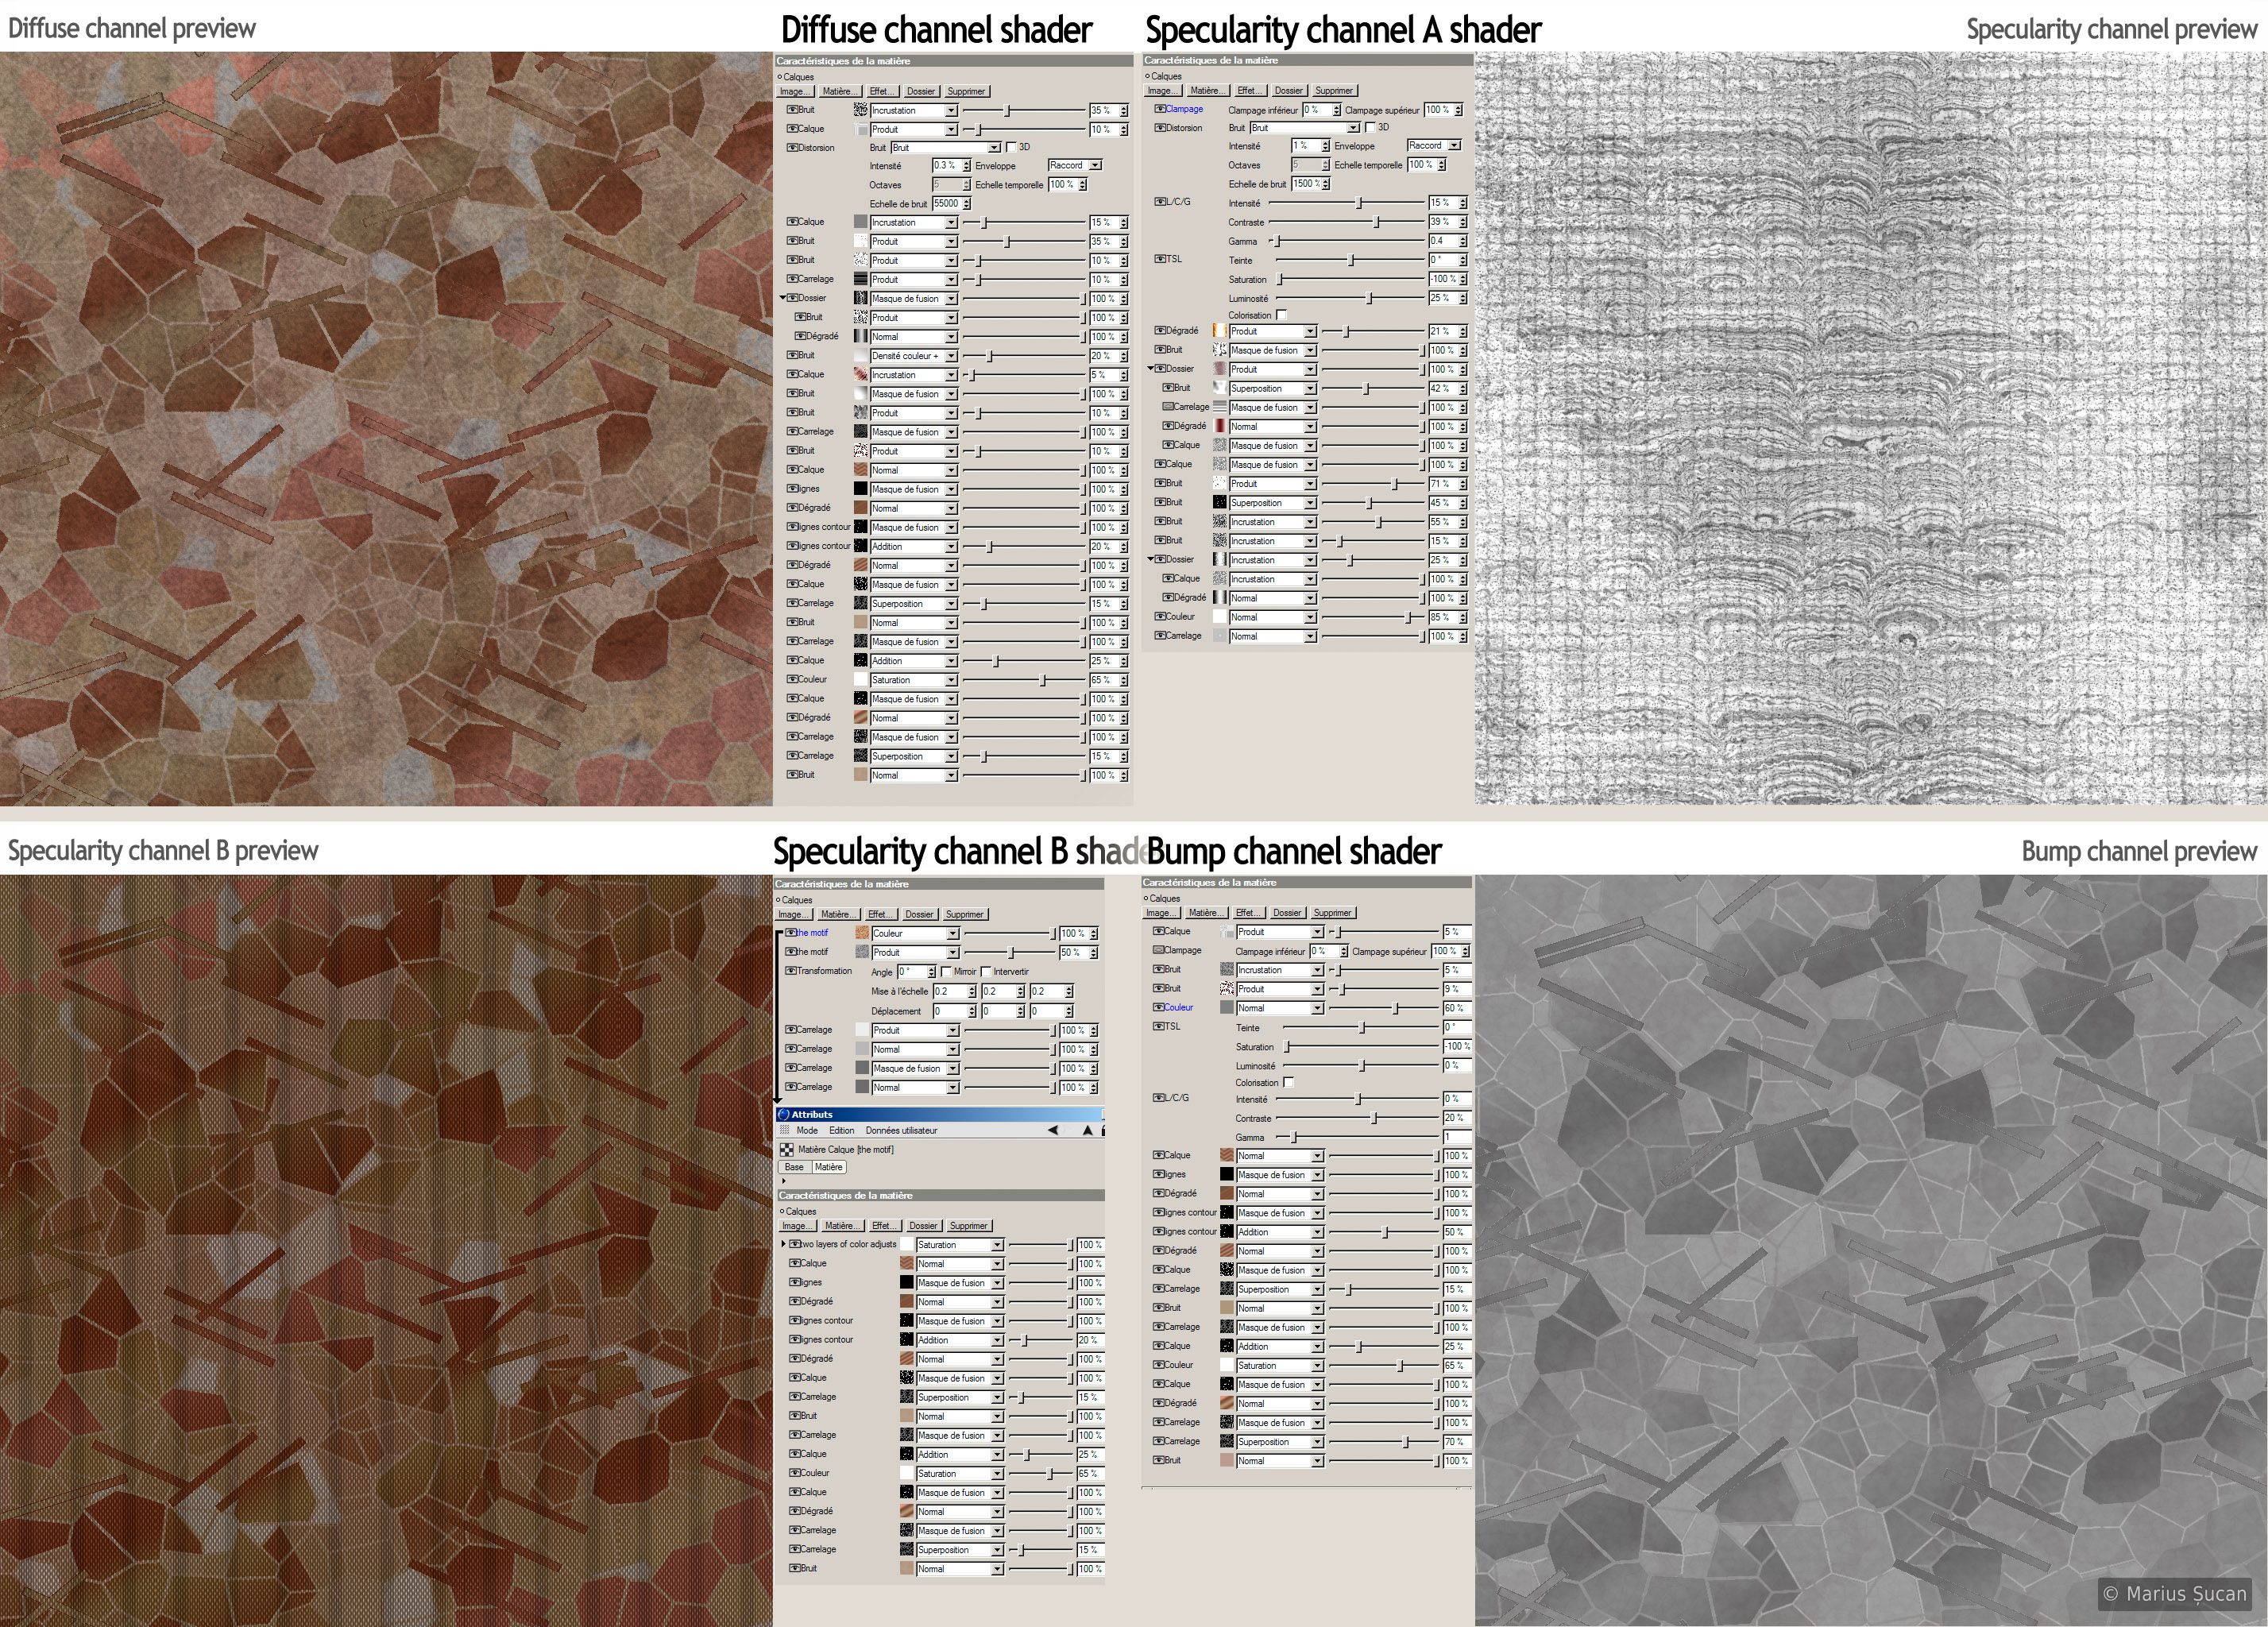
Carpet
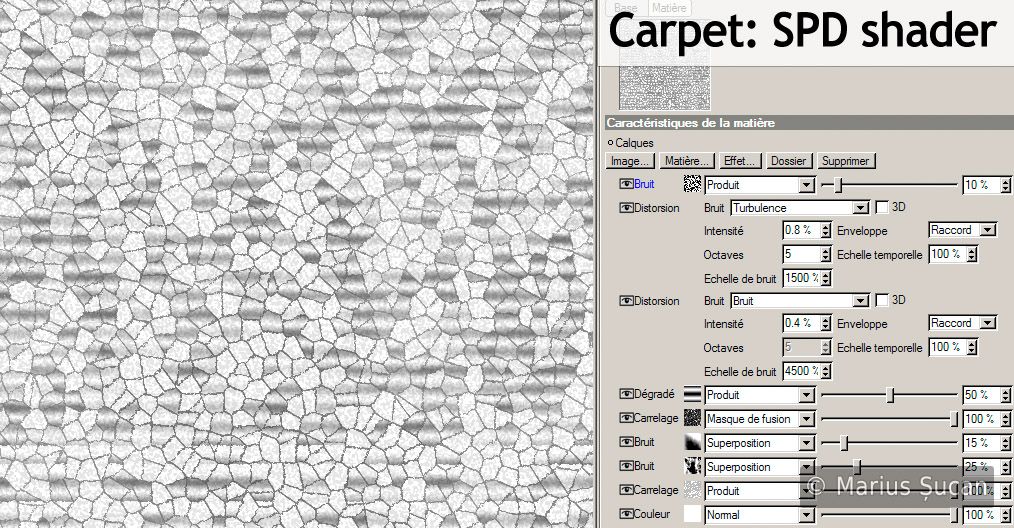
The carpet is just a simple plane object. The shader is very complex. It has 3 specularity channels, and of course, a bump and a diffuse channel, all having complex procedural shaders. To detail it, I also used SPD. In the following image you can see several comparative renders with the carpet, to observe the different shader channels.
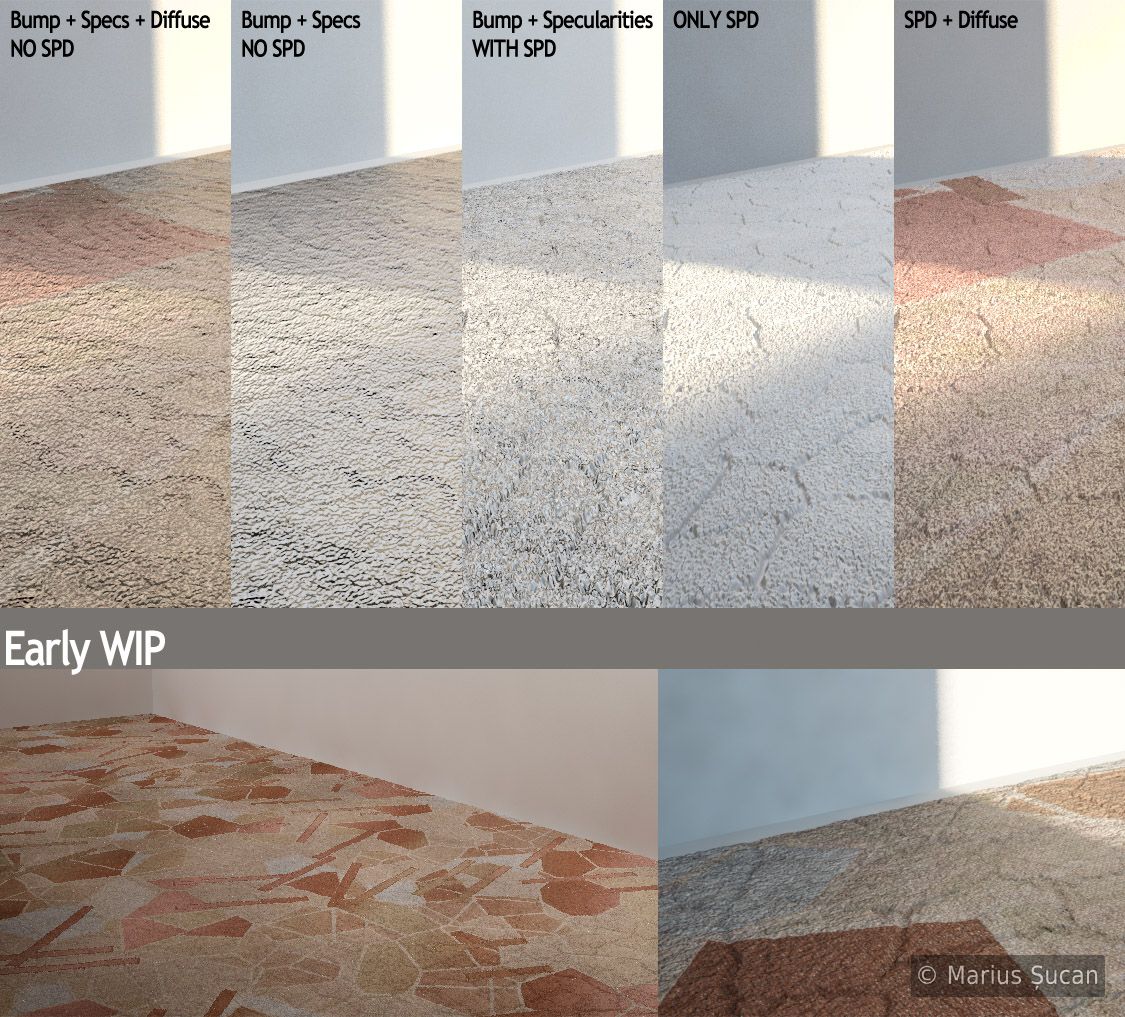
The following image illustrates the complexity of the shader of this carpet. I also included preview renders of each channel. As you can see, it's tile shaders, noise shaders and other shaders stacked in abundance.
The SPD shader, presented in the following image, is baked for the final renders to optimize the scene.
Piano
If you are accustomed already with seeing tons of shaders stacked for each channel, then you'll be surprised. The piano is textured in a much simpler fashion. The piano was the first object I textured in the scene. The complexity of the whole texturing process is derived from other aspects. As I will show you in the images, you'll see that the shaders for each of the channels used, are consisting basically of only one or two external images, combined with a noise shader as a mask, and finally, some colour adjustments to match the two.
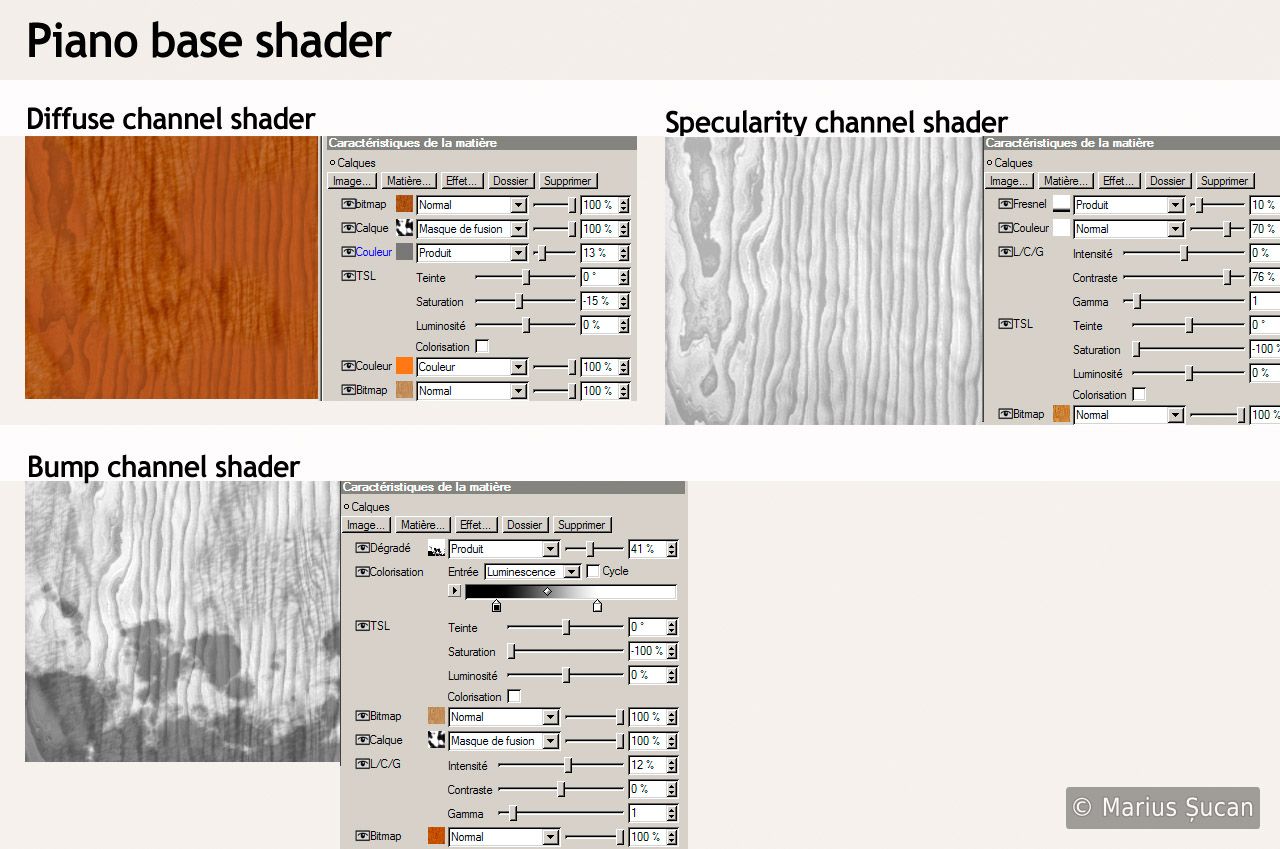
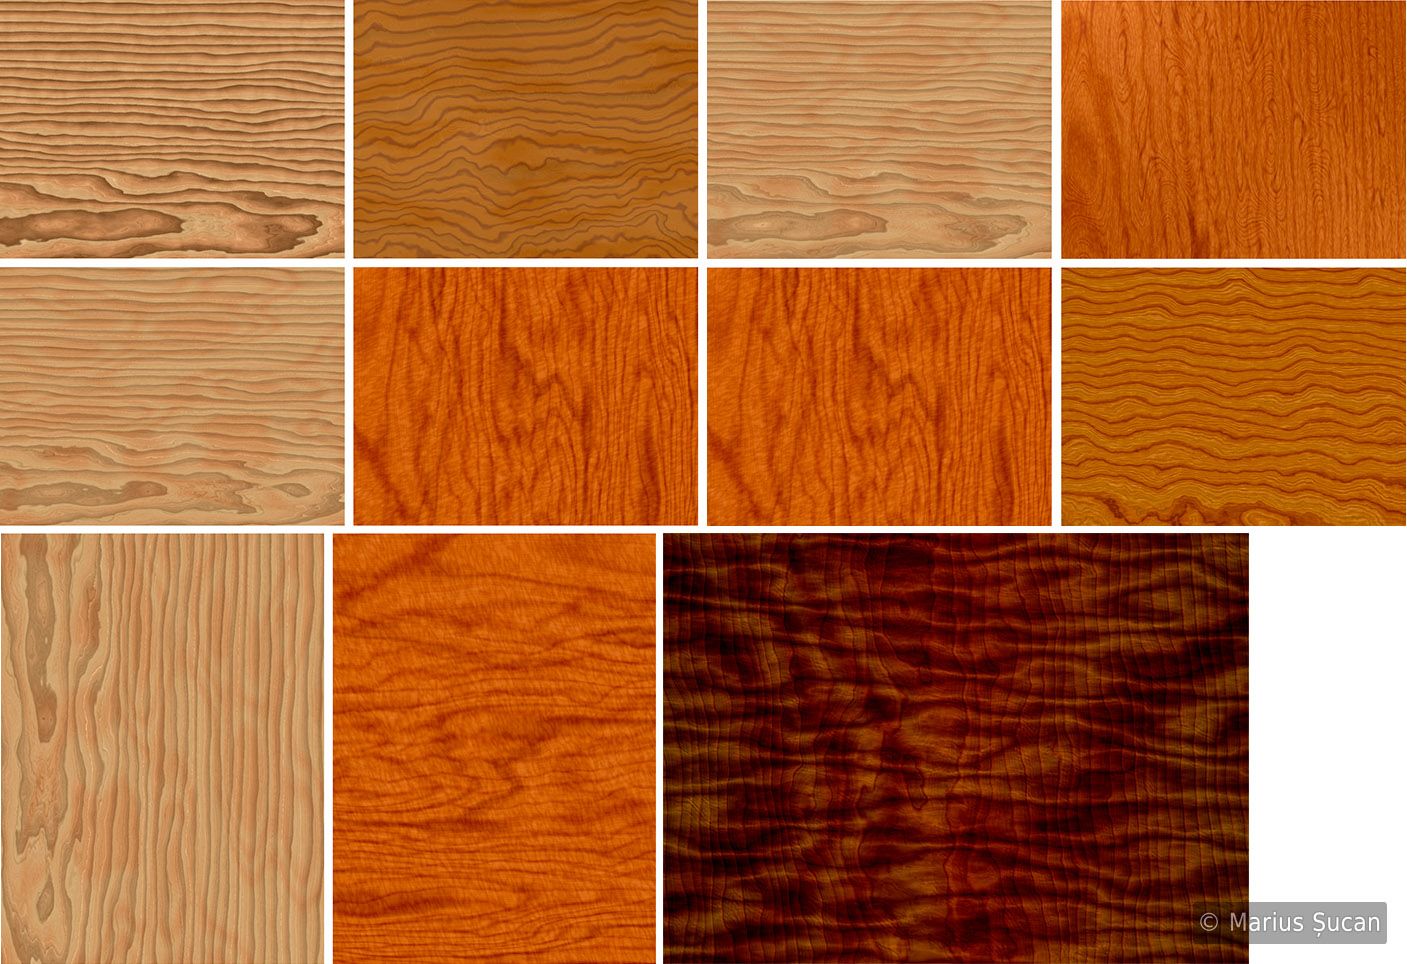
For the piano, I generated about 15 wood variations, in the end I used about 11 variations. As you noticed, for the base shader of the piano corpus, I used two wood variations, but I also created multiple materials which I stacked onto the object. These materials are all decals which use different wood types. The other shaders are basically the same, but with darker woods and decreased reflection intensities. The wood image textures were generated with Corel Texture and edited in Photoshop.
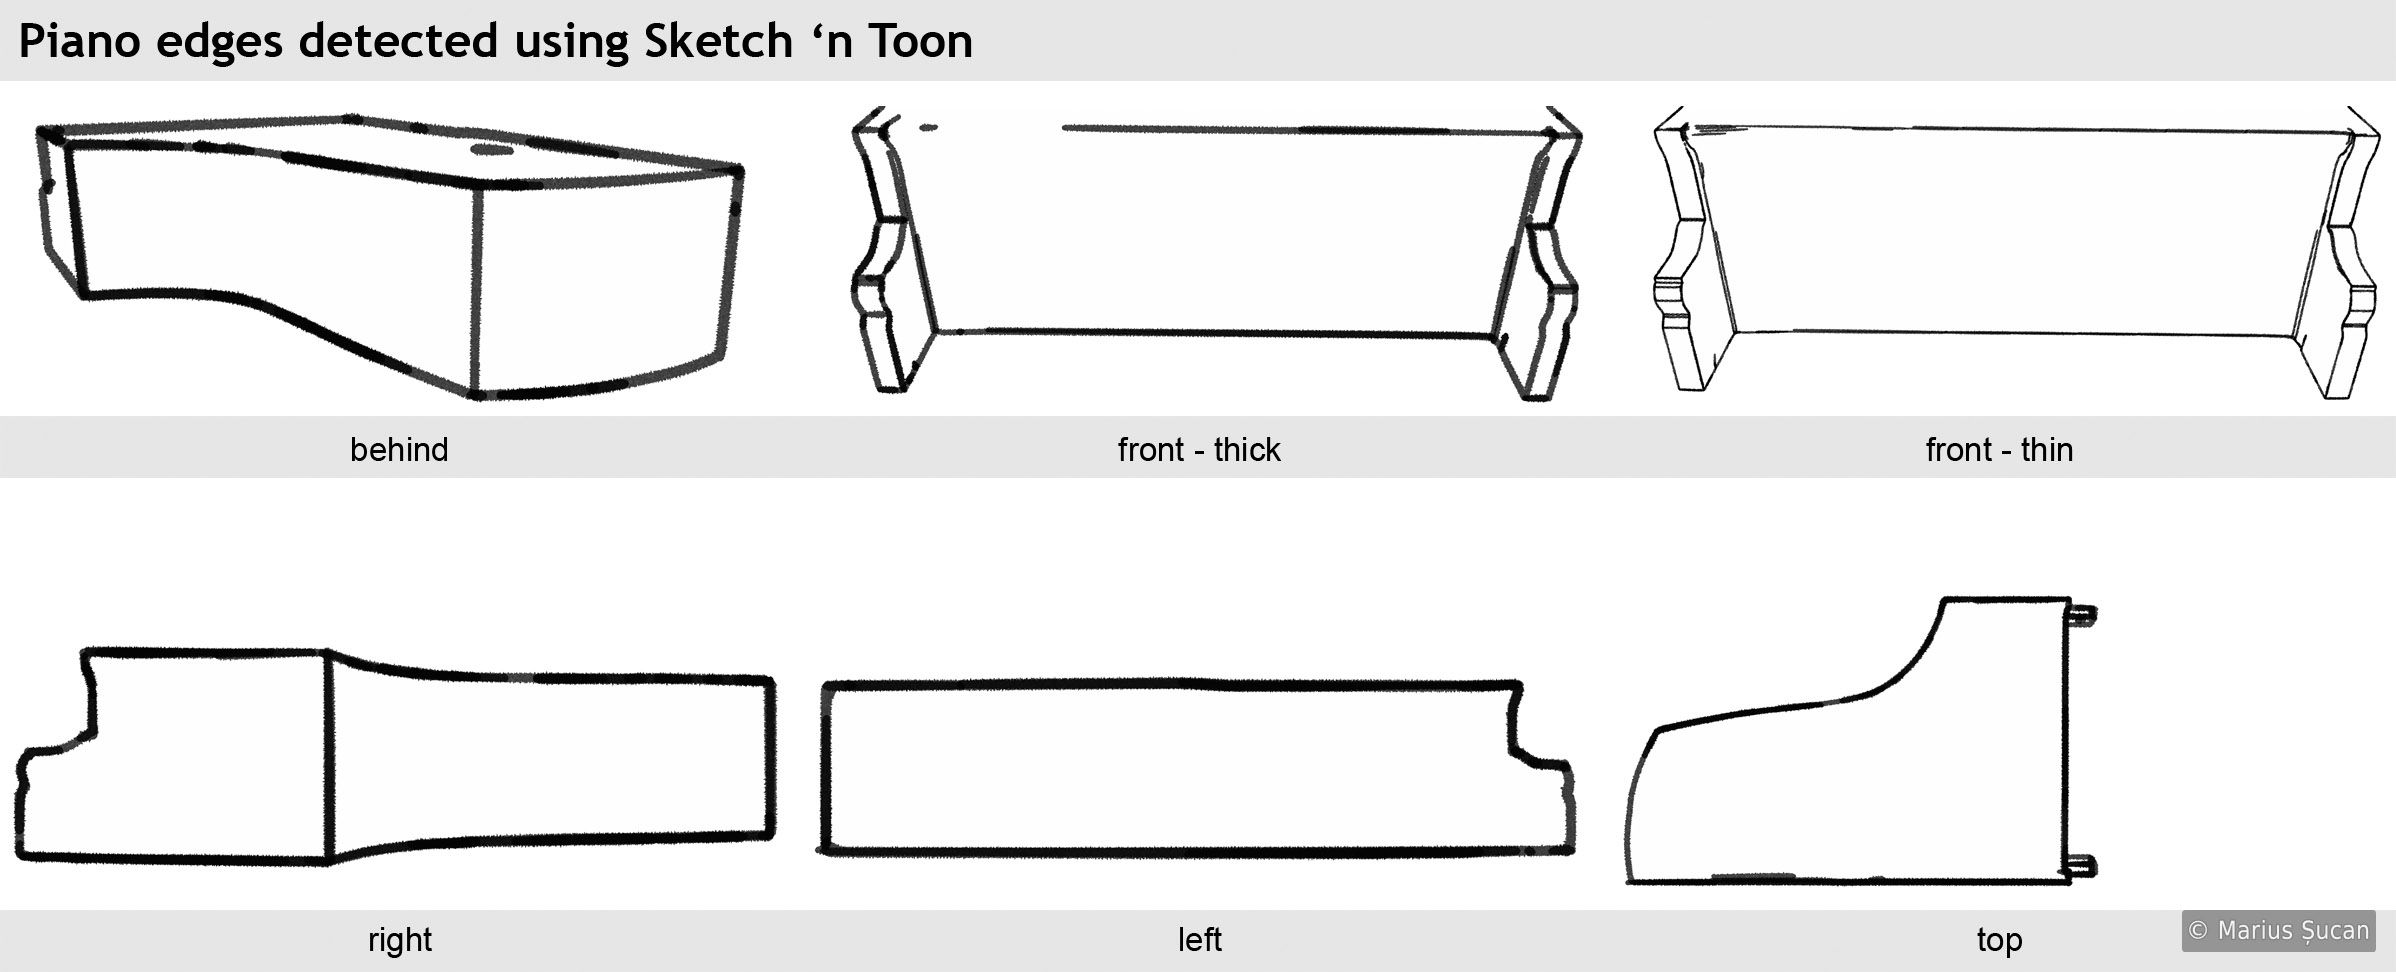 To make the edges of the piano look old, rusty, I had to use "Sketch and Toon" - C4D module for rendering cartoons. At first, I wanted to use a simple shader to help me detect the edges of the piano.
Something that will generate a dark line, of a given width along the defined angle threshold for detecting edges. But,
unfortunately, I didn't find any such shader for C4D. Then, I had to pick between
painting using Bodypaint or using "Sketch and Toon". I decided to use "Sketch and Toon" to trace the edges of the
piano from multiple perspectives: top, front, left, right and back. After I finished all these renders, I then
projected all the renders onto the object using the same camera angles, with Bodypaint. I used the resulting
texture map as a mask for a dark wood material stacked on the object. In the end, I had 6 stacked material tags on
top of the base material tag of the object. In the following image, you can see the initial "Sketch and Toon"
render perspectives which seem a bit rough, but they were heavily edited during the actual projection process in
Bodypaint.
To make the edges of the piano look old, rusty, I had to use "Sketch and Toon" - C4D module for rendering cartoons. At first, I wanted to use a simple shader to help me detect the edges of the piano.
Something that will generate a dark line, of a given width along the defined angle threshold for detecting edges. But,
unfortunately, I didn't find any such shader for C4D. Then, I had to pick between
painting using Bodypaint or using "Sketch and Toon". I decided to use "Sketch and Toon" to trace the edges of the
piano from multiple perspectives: top, front, left, right and back. After I finished all these renders, I then
projected all the renders onto the object using the same camera angles, with Bodypaint. I used the resulting
texture map as a mask for a dark wood material stacked on the object. In the end, I had 6 stacked material tags on
top of the base material tag of the object. In the following image, you can see the initial "Sketch and Toon"
render perspectives which seem a bit rough, but they were heavily edited during the actual projection process in
Bodypaint.
As you can understand, the complexity of the whole process is derived from the aforementioned facts. Besides the already mentioned aspects, The process of generating the UV map of the piano corpus was a hard thing as well. A lot of patience and time went into adjusting them, and the same it was for the armchairs too.
Another very nice achievement is the piano title. On the front, one can read "Ehren preis. Franz Chalupny in Wien. Auszeichnung 1868". Using the reference photos I recreated the entire front title in Photoshop at a huge resolution: 8796 x 1236 pixels. I used multiple fonts for the texts and then, I edited the letters which didn't fit with the real design. The contour is done with a C4D spline, swept and then, the object was rendered as white. The two stars were also done in C4D with an array object. The small decorations on the letters were added manually, in Photoshop.

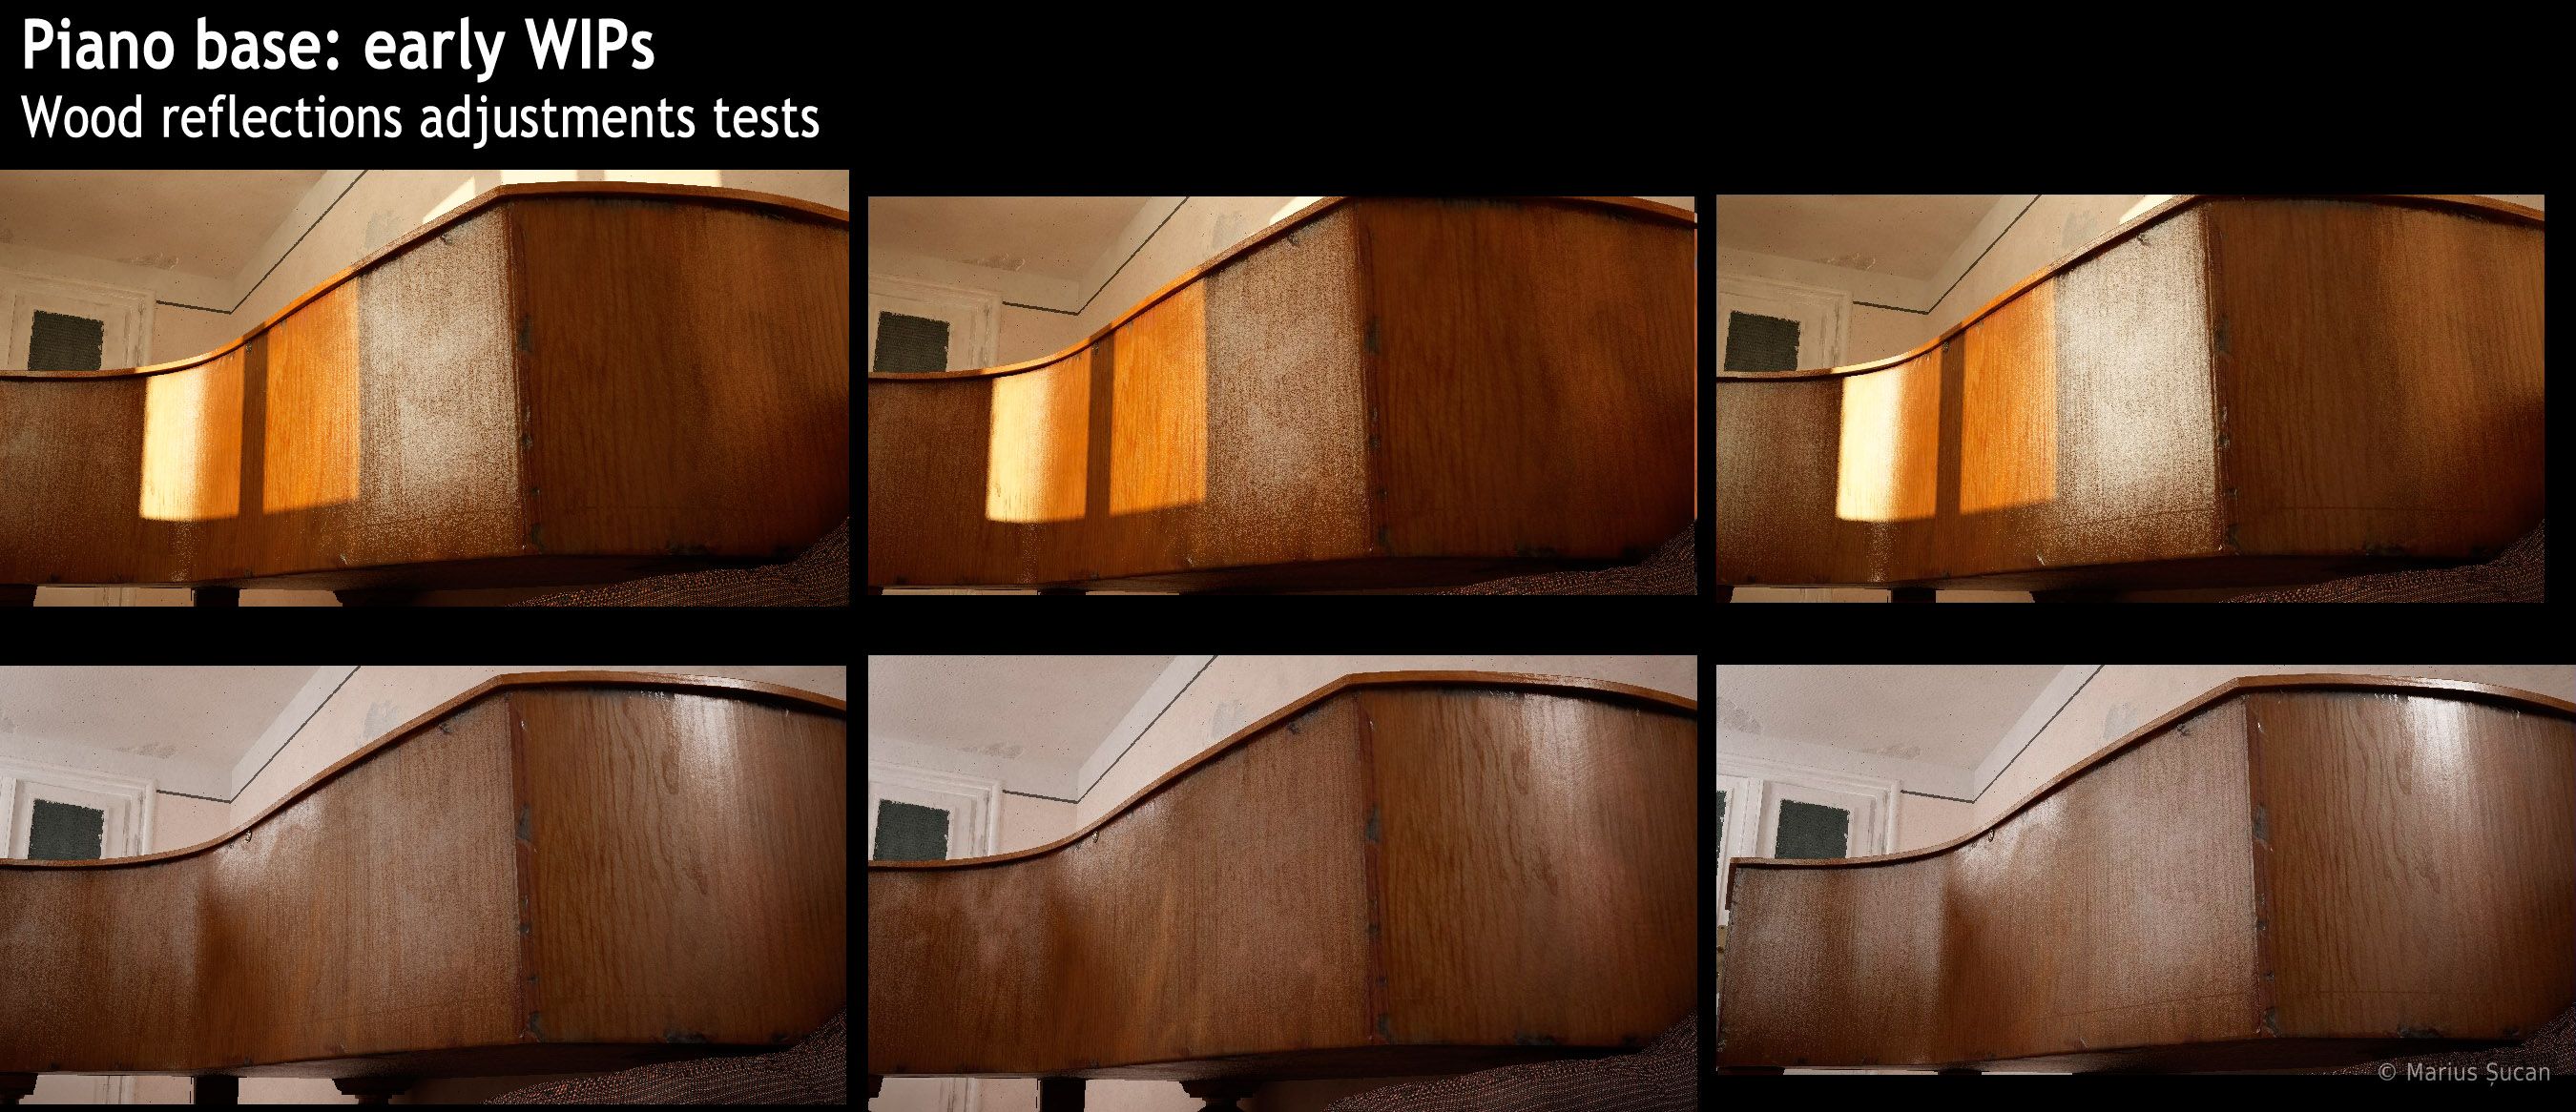
In total, the piano has 30 materials, in the C4D material manager. The following image is a collage of multiple early WIP images, sorted by date. Attention: image resolution is 5500 x 4700 pixels and the JPEG file size is 2,8 megabytes.

Here's another special set of renders I saved which shows the details of the piano base shader and a few variations in reflections, in two different types of lighting:
Curtains
Once again, the shaders of the curtains are complex ones. I have 3 materials: the red curtains, the white curtains and the top curtains.
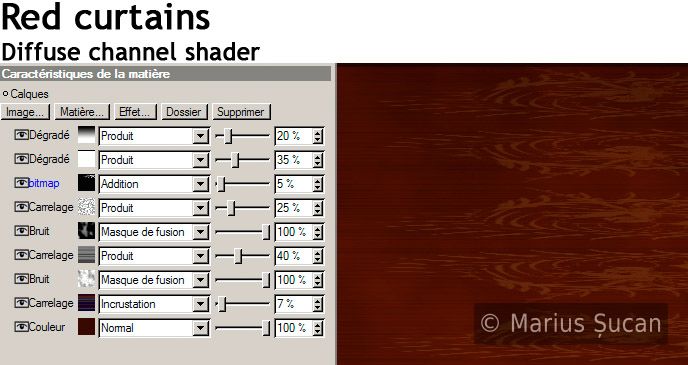
In particular, the shader of the red curtains is relatively simple: bump channel, two or three specularity channels for reflections, the diffuse channel and of course, for SSS, the refractions channel. In the specularity channels, I only used one or two shaders, nothing fancy to show. In the diffuse channel, I have something a bit more complex.
The white curtains are considerably more complex. One may see this in the following image which presents the channels used:
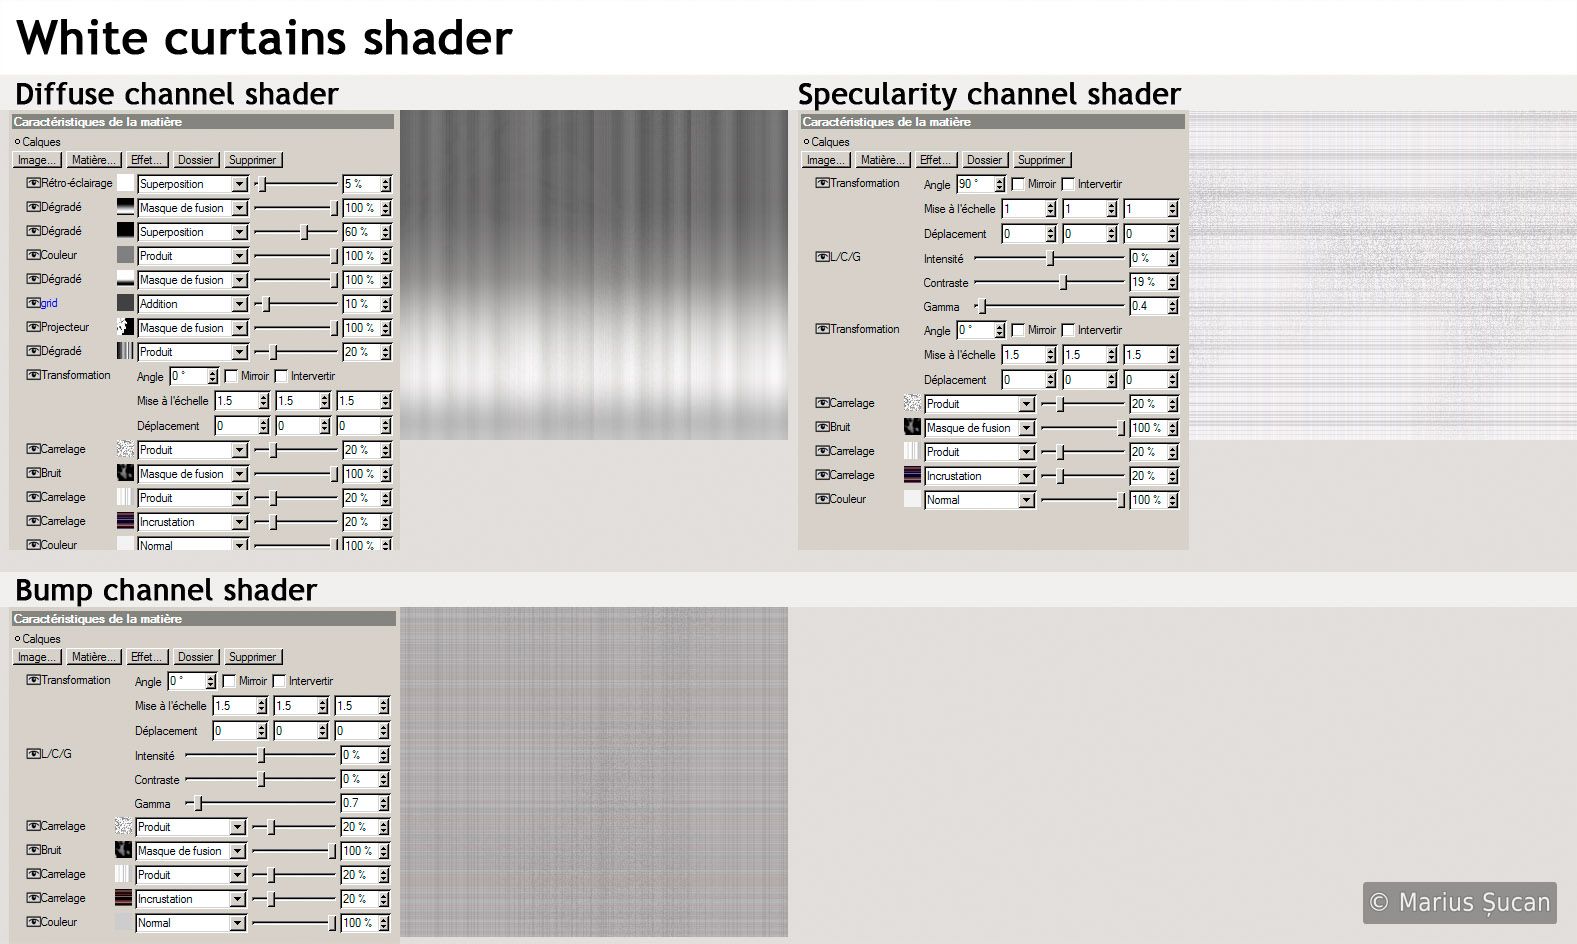
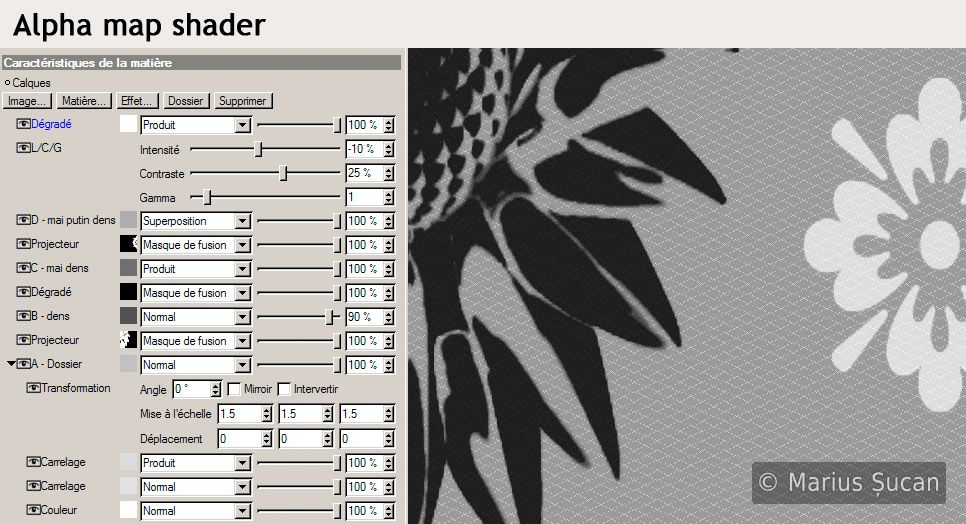
The alpha channel is a floral motif. I used for it more flowers and plants from "The wind of change" project. I rendered the flowers with "Sketch and Toon". The shader is constructed using three levels of density for the net. I created a net using about 3-5 tile shaders, and then made three variations which differ in density. As such, I used two layer maps of the floral motif as masks for the different levels of density. Now, you can see in the next image the stacked shaders for the alpha map and the preview. I also present the floral motif. Notice that I named the different density levels for the net: A - the base net, B - dense, C - denser and D - a lot less dense. "A" is a folder to show you how the others are, the only difference being one or two more layers and different tile shader scaling.

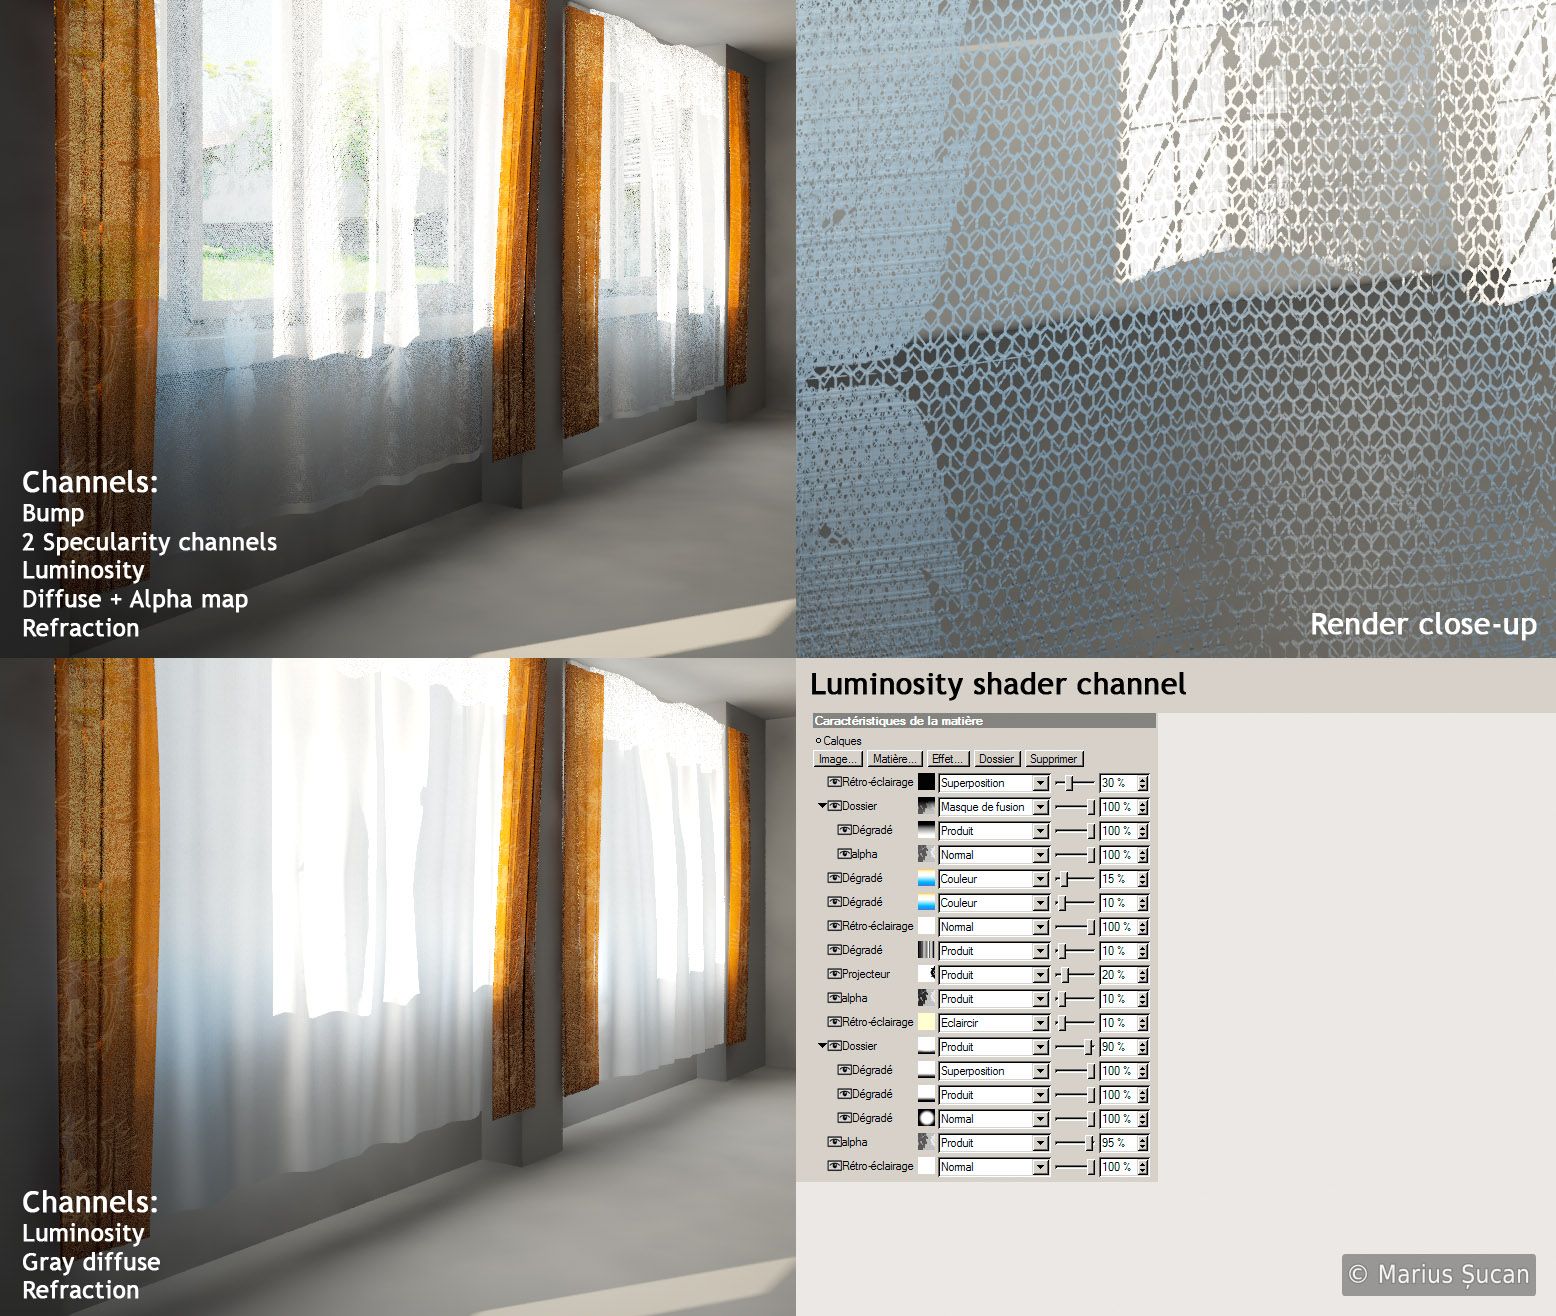 The SSS effect was rather hard for me to achieve, more precisely, the right
intensity and colouring. Using solely the Refractions channel didn't yield the results I was looking for, nor the 2-sided
special material from Vray. One specific thing I was looking for was
increasing the impact of the sunlight on the curtains and I also wanted to increase the level of GI generated in the room by them. I used the Luminosity channel, because I didn't find a way to increase the SSS strength within Vray and all my shaders in the diffuse channel were clamped to a non-HDRI . Luckily, in the Luminosity channel, this didn't happen. Only the Backlight shader satisfied my needs, in Oren-Nayar
shading mode. I also added a composition tag to set the curtains to generate 3 times more GI. In the following images, you'll be able to compare the curtains rendered using only the Refractions and
Luminosity channels for SSS and then with all the channels of the curtains
material. I also included a close-up to show how detailed it is, and the shaders list of the Luminosity channel. Keep
in mind, the layer named "alpha" is the shader with the different net densities stacked as seen in the last image where
the alpha map shader was put into discussion.
The SSS effect was rather hard for me to achieve, more precisely, the right
intensity and colouring. Using solely the Refractions channel didn't yield the results I was looking for, nor the 2-sided
special material from Vray. One specific thing I was looking for was
increasing the impact of the sunlight on the curtains and I also wanted to increase the level of GI generated in the room by them. I used the Luminosity channel, because I didn't find a way to increase the SSS strength within Vray and all my shaders in the diffuse channel were clamped to a non-HDRI . Luckily, in the Luminosity channel, this didn't happen. Only the Backlight shader satisfied my needs, in Oren-Nayar
shading mode. I also added a composition tag to set the curtains to generate 3 times more GI. In the following images, you'll be able to compare the curtains rendered using only the Refractions and
Luminosity channels for SSS and then with all the channels of the curtains
material. I also included a close-up to show how detailed it is, and the shaders list of the Luminosity channel. Keep
in mind, the layer named "alpha" is the shader with the different net densities stacked as seen in the last image where
the alpha map shader was put into discussion.
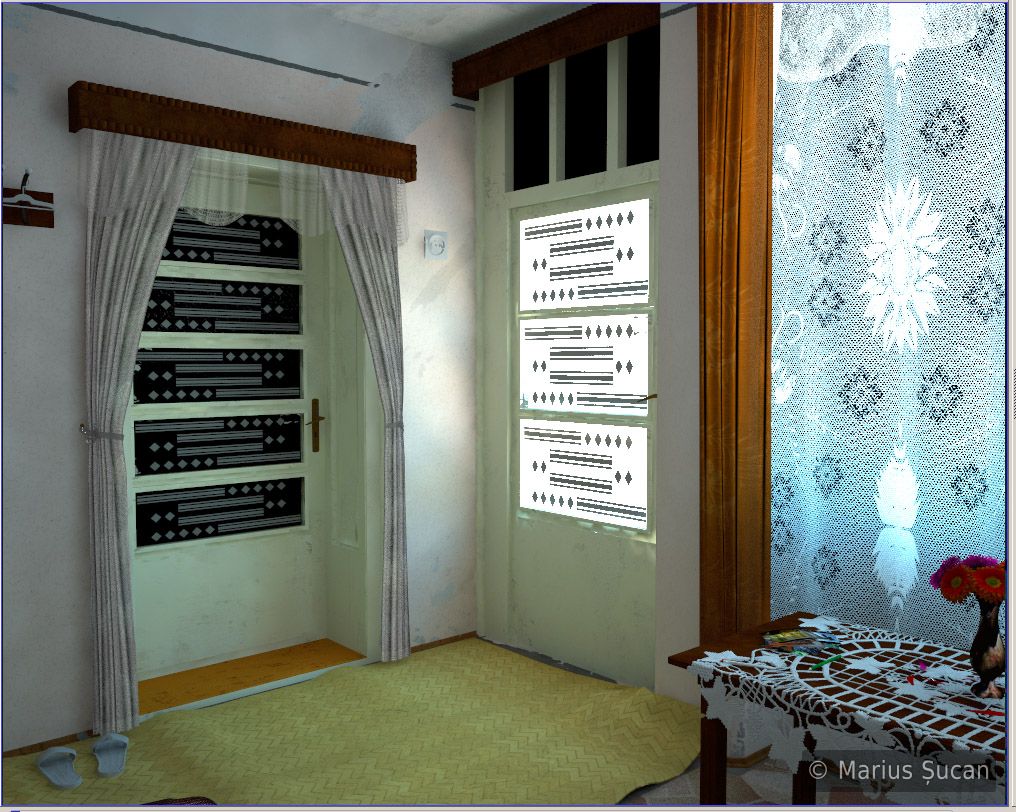
The room
The majority of objects in the room are textured in the same way as the objects I've already talked about. In the following paragraphs I'll talk about the most notable ones. These are the walls, the electrical monitoring system, the table cloth on the piano, the flowers and the seat of the chair in the front of the piano.
For the walls of the room, I made a complex shader which mimics an old painted wall, where the paint is already off in patches. I created two complex shaders using multiple stacked noise shaders: one's the wall paint and the other's the "raw" material of the wall. These two were put into the diffuse and bump channels. The bump channel, of course, in the areas where the paint is not off, is smoother.
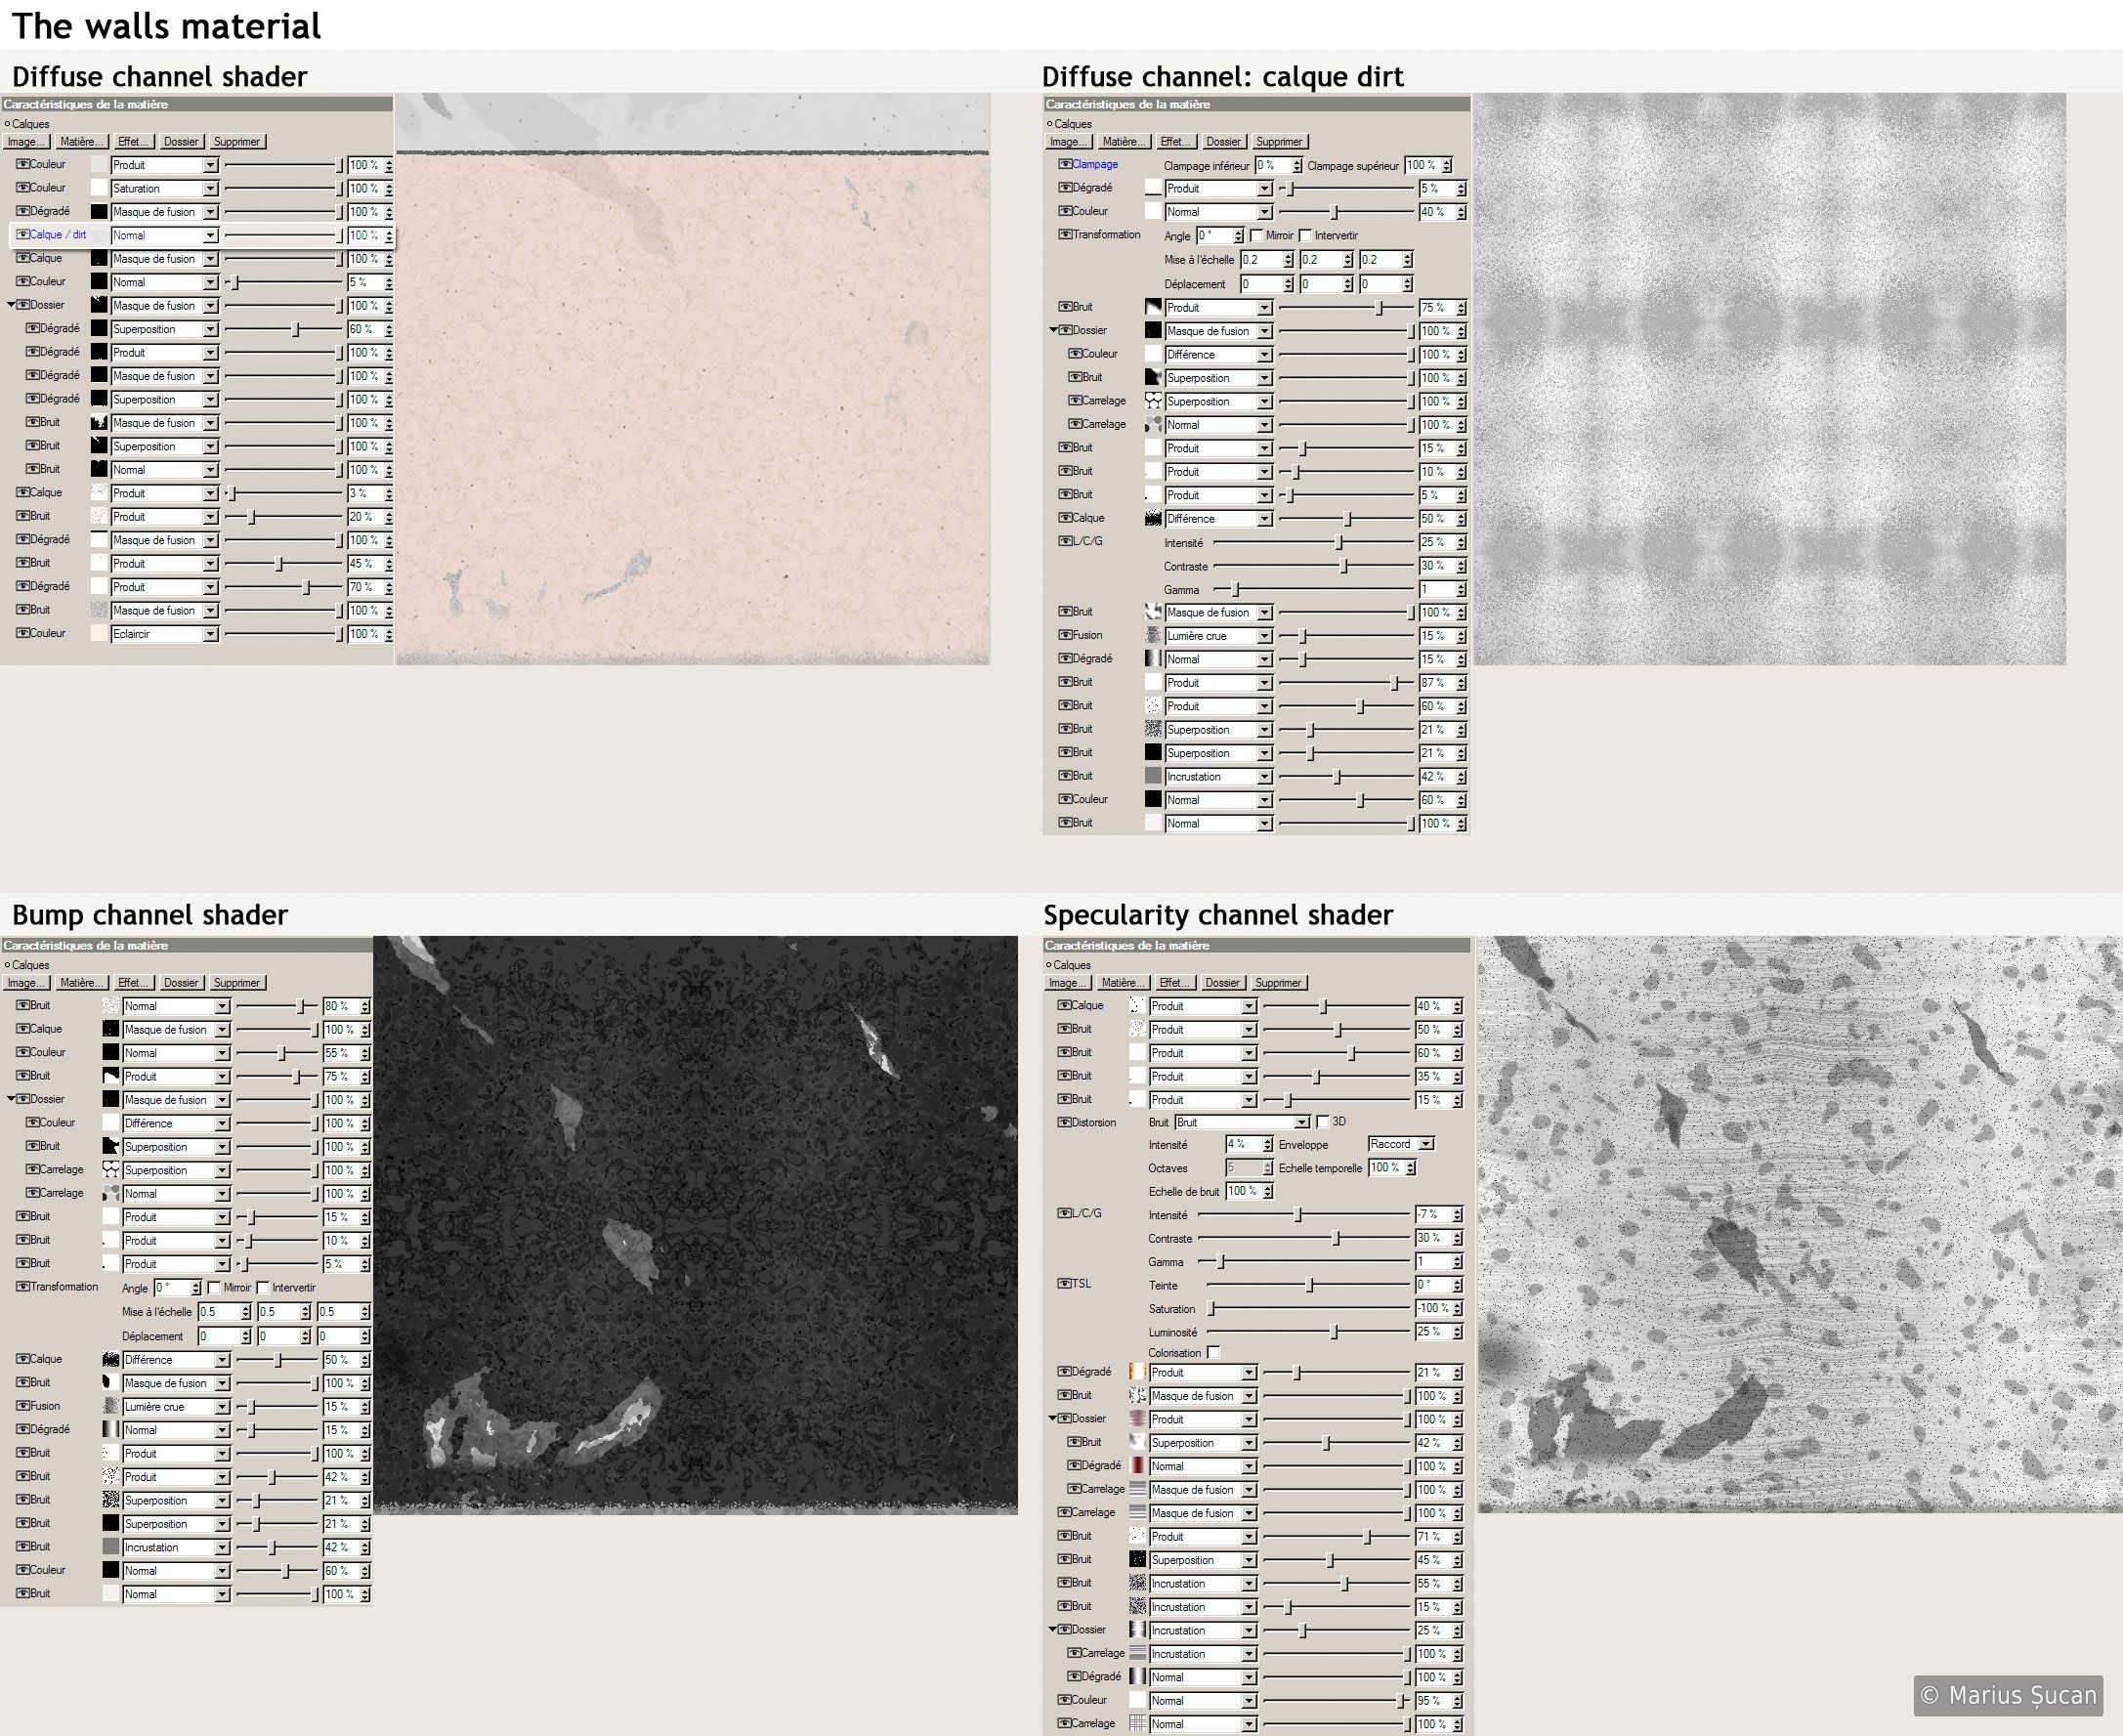

The same technique was used for texturing the doors and the windows frames. The only important difference is that the paint was yellowish, more reflective and to reproduce the effect of time, the wood's rather dark where the paint is scratched off.
I also need to mention that the real room is completely remodeled in 3D. In the final renders, two doors were not visible, which are in fact, the entrance in the room. Here are several WIP images:

Electrical monitoring system
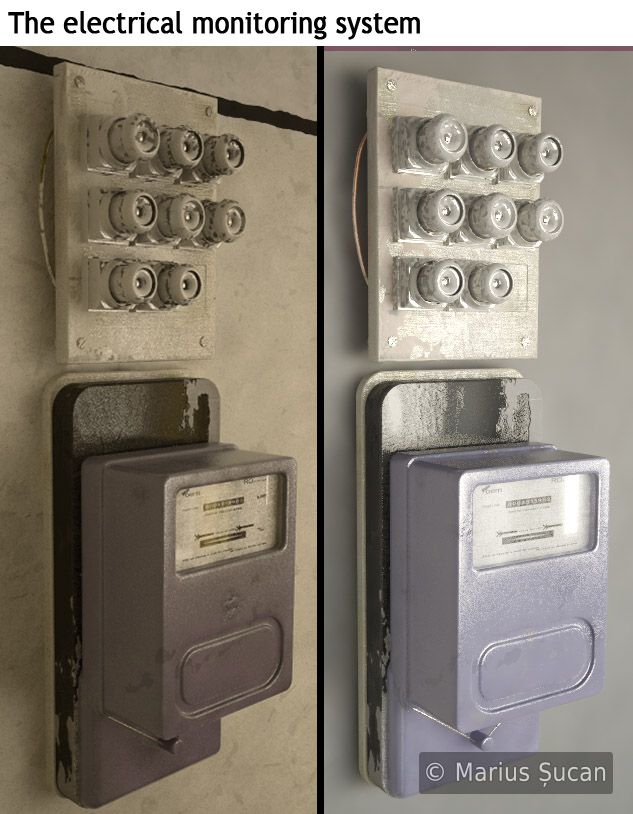 The electrical monitoring system (EMS) is also textured in details. The fuses and the base of the EMS are dirty. I
used the same technique as before to add the wall painting splatter or the dark and old look for the fuses. The technique
simply consists of having several Layer shaders in which I stack multiple shaders and I combine them using alpha masks
which are shaders as well, in all three important channels: bump, specularities and diffuse. As I mentioned in the
introduction of this chapter, I developed preset shaders as I worked on the textures of the objects. Maybe you have
already noticed that certain shaders are repeating and they differ only a bit. For the EMS, I reused two or three such
shaders and this way, I quickly finished texturing it. Only the blueish component has a really new shader. For example,
for the black part I reused the sockets shader and the wall paint shader, mixed using alpha maps. As such, it's inevitable
the shaders of the EMS are abundantly complex and showing the huge network of stacked shaders in layers is now redundant
and repetitive. So, I decided to only show you a close-up of the EMS and of the sockets.
The electrical monitoring system (EMS) is also textured in details. The fuses and the base of the EMS are dirty. I
used the same technique as before to add the wall painting splatter or the dark and old look for the fuses. The technique
simply consists of having several Layer shaders in which I stack multiple shaders and I combine them using alpha masks
which are shaders as well, in all three important channels: bump, specularities and diffuse. As I mentioned in the
introduction of this chapter, I developed preset shaders as I worked on the textures of the objects. Maybe you have
already noticed that certain shaders are repeating and they differ only a bit. For the EMS, I reused two or three such
shaders and this way, I quickly finished texturing it. Only the blueish component has a really new shader. For example,
for the black part I reused the sockets shader and the wall paint shader, mixed using alpha maps. As such, it's inevitable
the shaders of the EMS are abundantly complex and showing the huge network of stacked shaders in layers is now redundant
and repetitive. So, I decided to only show you a close-up of the EMS and of the sockets.
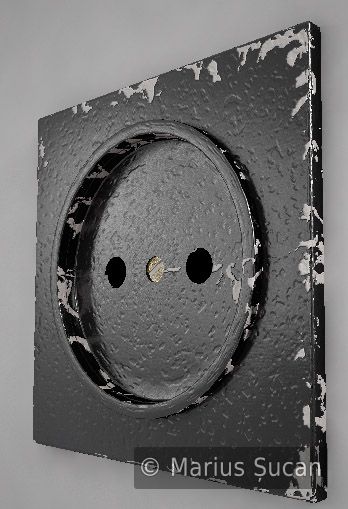

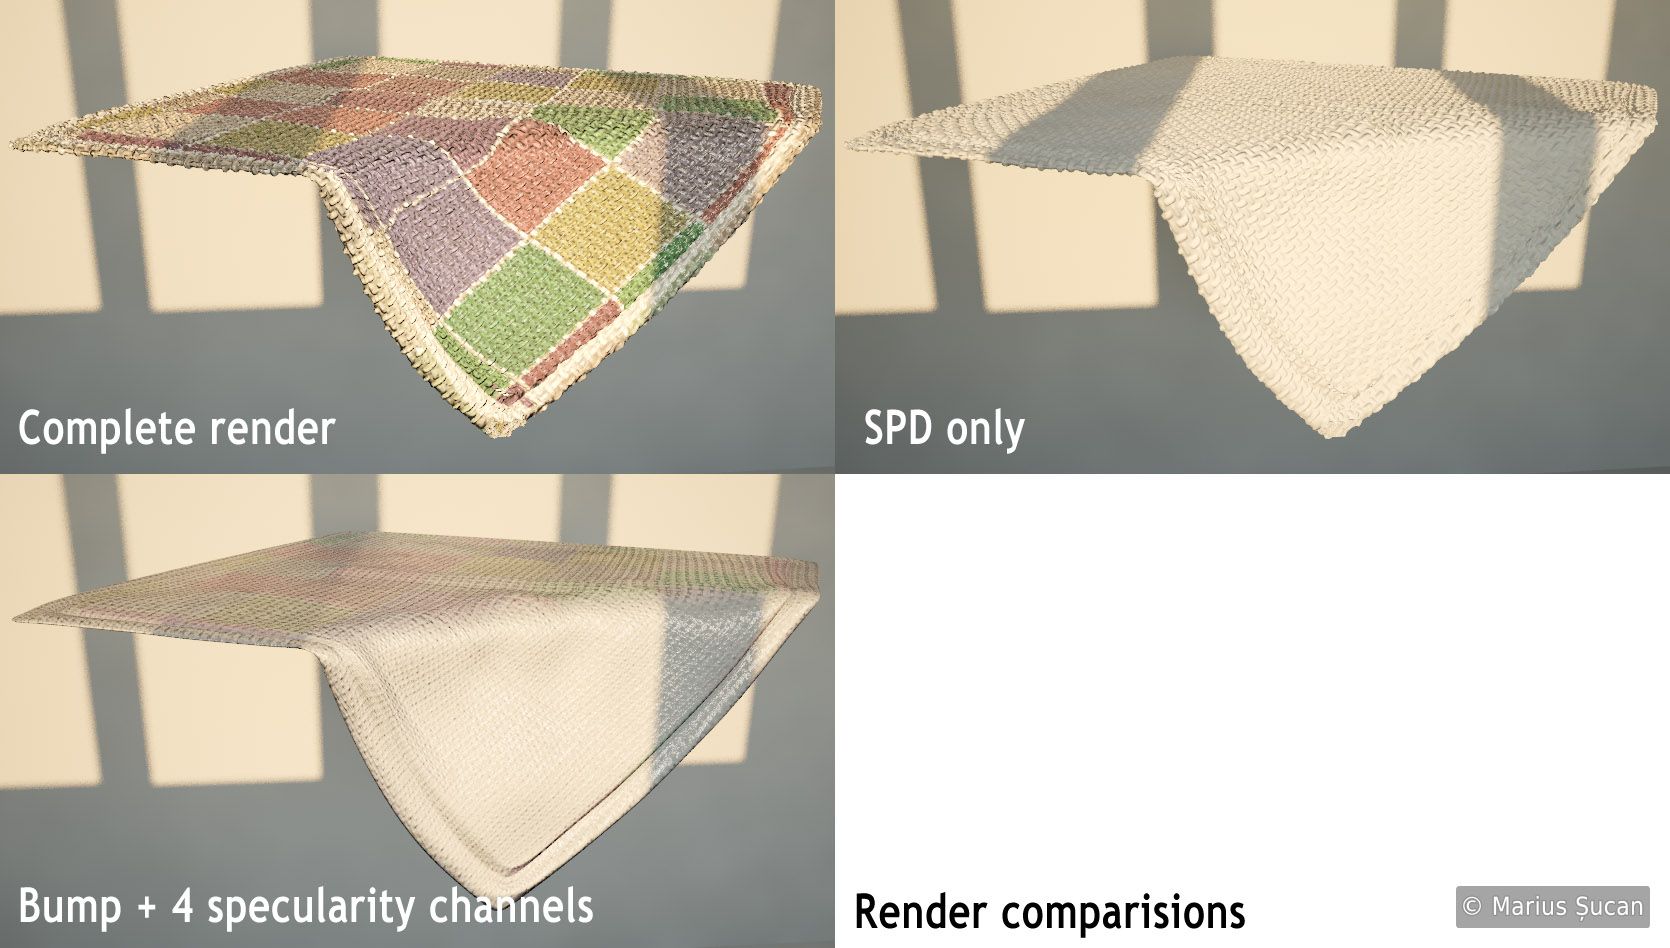
Table cloth on the piano
The table cloth on the piano is definitely a beast of its kind. It got 4 specularity channels, a bump channel ;), two diffuse channels and the refraction channel for SSS. In the entire scene there are only a few materials that use two diffuse channels. Besides this, it is detailed with SPD. I think I overran myself here with this shader. For each channel I have an unbelievable complex shader structure, as seen until now through these pages.
I'm posting an image, below this paragraph, with the channel shaders for the table cloth on the piano. As you can tell, the complexity is beyond any imaginable purpose. In the two diffuse layer channels, I have the same shader tree, but as you can see, different settings: the second channel is brighter. I did this, because the table cloth was looking too dark and I wanted to increase its brightness. In the first diffuse channel I used a fresnel shader as an alpha and in the second one a Noise shader. This allows the SSS effect to happen. As I already said, I have enabled the refraction channel, and also Volume and SSS effects. The first two specularity channels have the same shader tree, but one is set to the Ward shading mode, and the other one to Blinn. Besides this, the two channels differ in colour, one's white and the other one's yellowish, and they have different fresnel angles and glossiness for the reflections.

I decided to render this object in an evening light setup, because it better emphasizes the reflections. You can notice the impact of the reflections in all the specularity channels, it's quite high, but it is greatly reduced when the diffuse channel is enabled and the SPD.
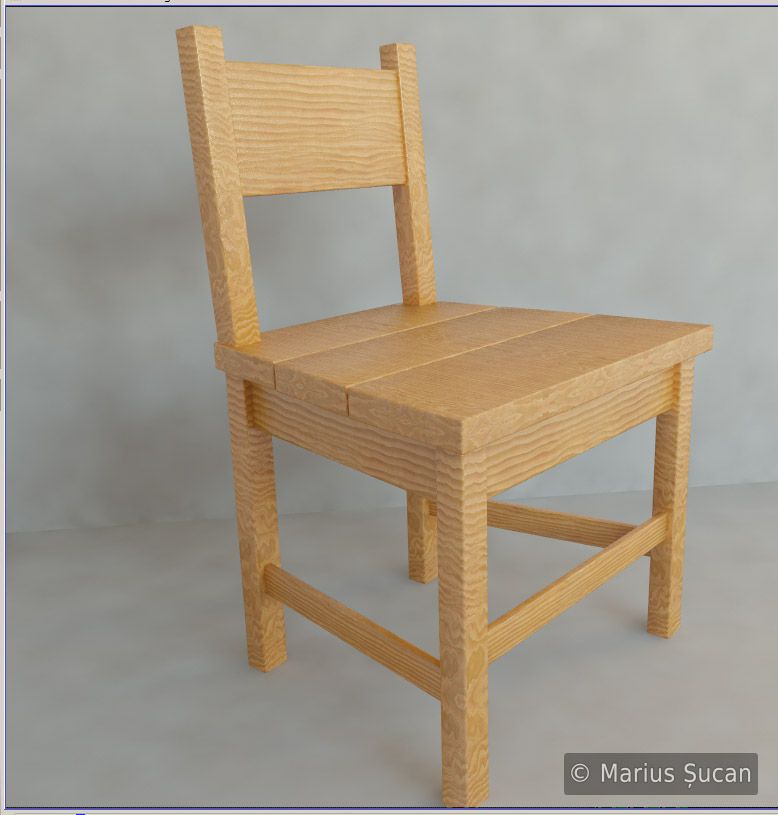
Chairs
In the scene, I have two chairs: one small with a set of tools on it and another one, bigger, in front of the piano. The small one has simple materials. Here are two renders showing this chair:.

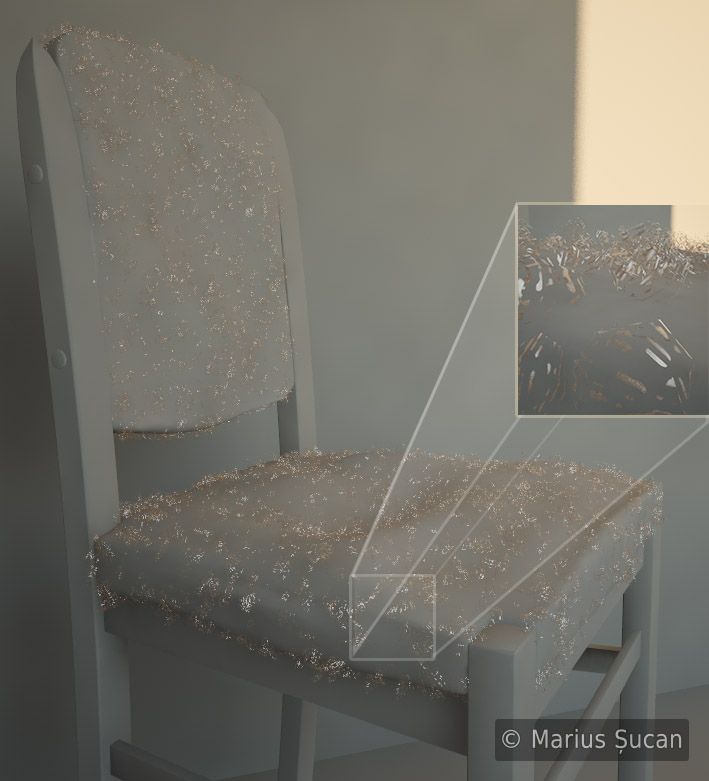
The materials of the big chair are more complex. In particular, the material for the seat is very advanced, because I started from the material of the table cloth found on the piano. Therefore, it inherits its level of complexity: a bump channel, 4 specularity channels and luckily, only one diffuse channel and no SSS. Furthermore, the shaders found in the channels are much simpler, an exception being the diffuse channel shader which is like all my utterly complex shaders. The image below shows the shaders of the channels. Again, the first two specularity channels are identical, but one is set to Ward mode and the other one to Blinn. You may also notice how simple the shaders are for the other two specularity channels.

And now, again a comparative render showing the fully fledged render of the chair and the specularity layers. The first image is an early render of this chair - for comparision purposes.
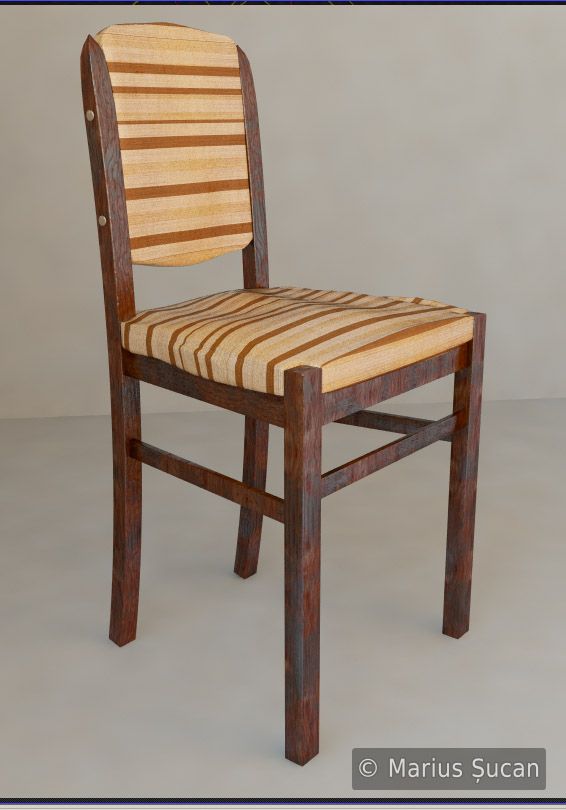

The complexity of this chair is not reduced to this material. I also added some sort of "fluff" to the back and seat parts. This fluff is achieved by cloning irregularly a multitude of spheres on the surfaces. This was done with Mograph - a C4D module for instancing and cloning objects. The material of the sphere is very simple, because I really wanted it so, but it managed to increase the render time considerably. It has a relatively simple shader as an alpha, and from the seat material it borrows the shaders for one specularity channel and of the diffuse channel. Both shaders are a bit simplified. The above renders do not include this "fluff", so here's a render with it:
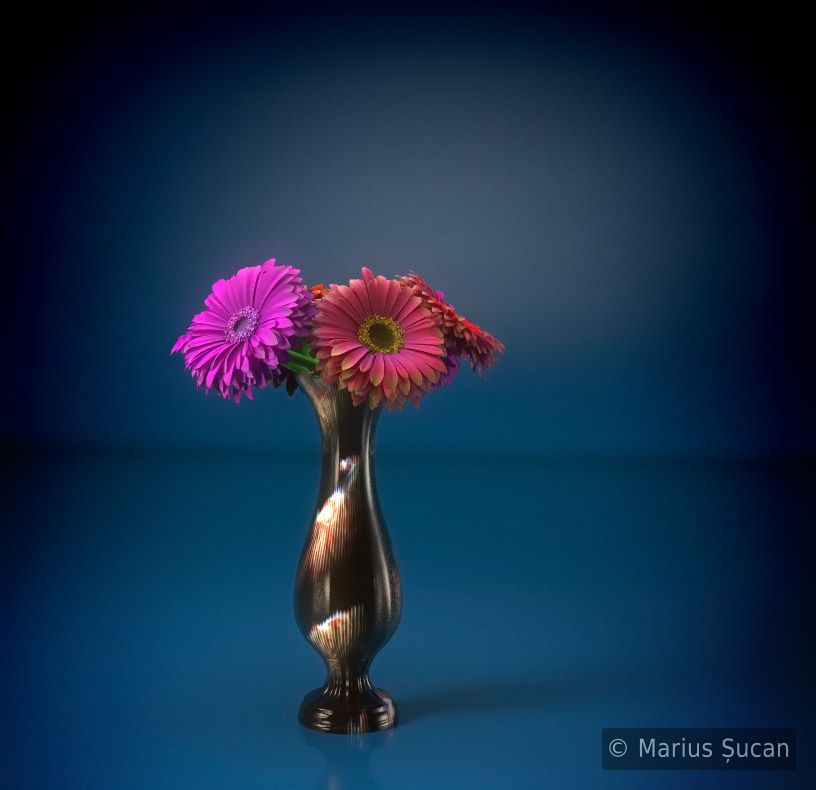
The flowers
The flowers have really simple shaders. Two specularity channels for the petals, a diffuse channel and the Refraction channel for SSS. The petals are coloured pink and red, and towards the tips I've set the same colour, but brighter and a bit more pale. In the channels, there are only a few stacked shaders so, nothing much to see. Here are some renders with the flowers:
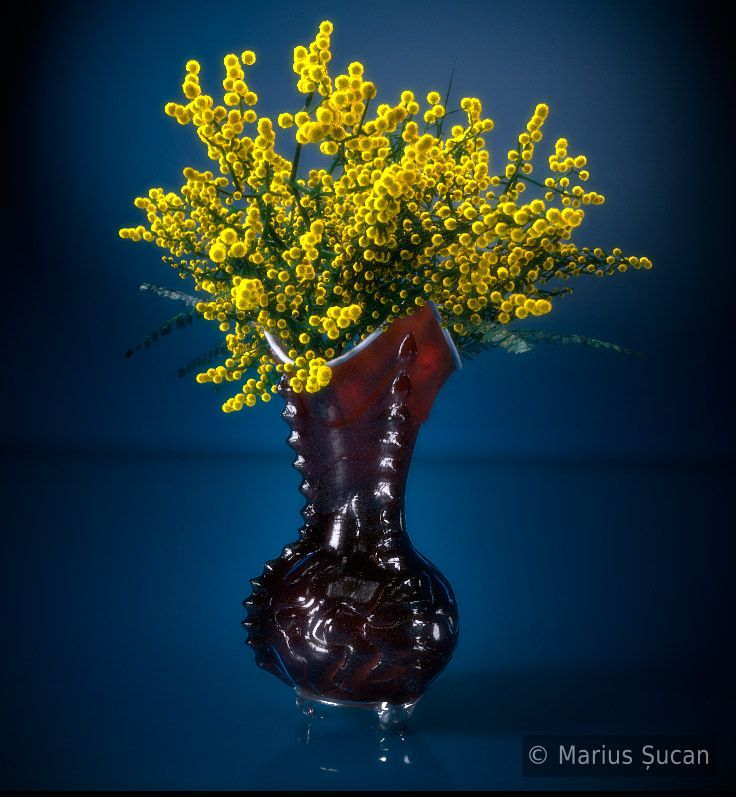
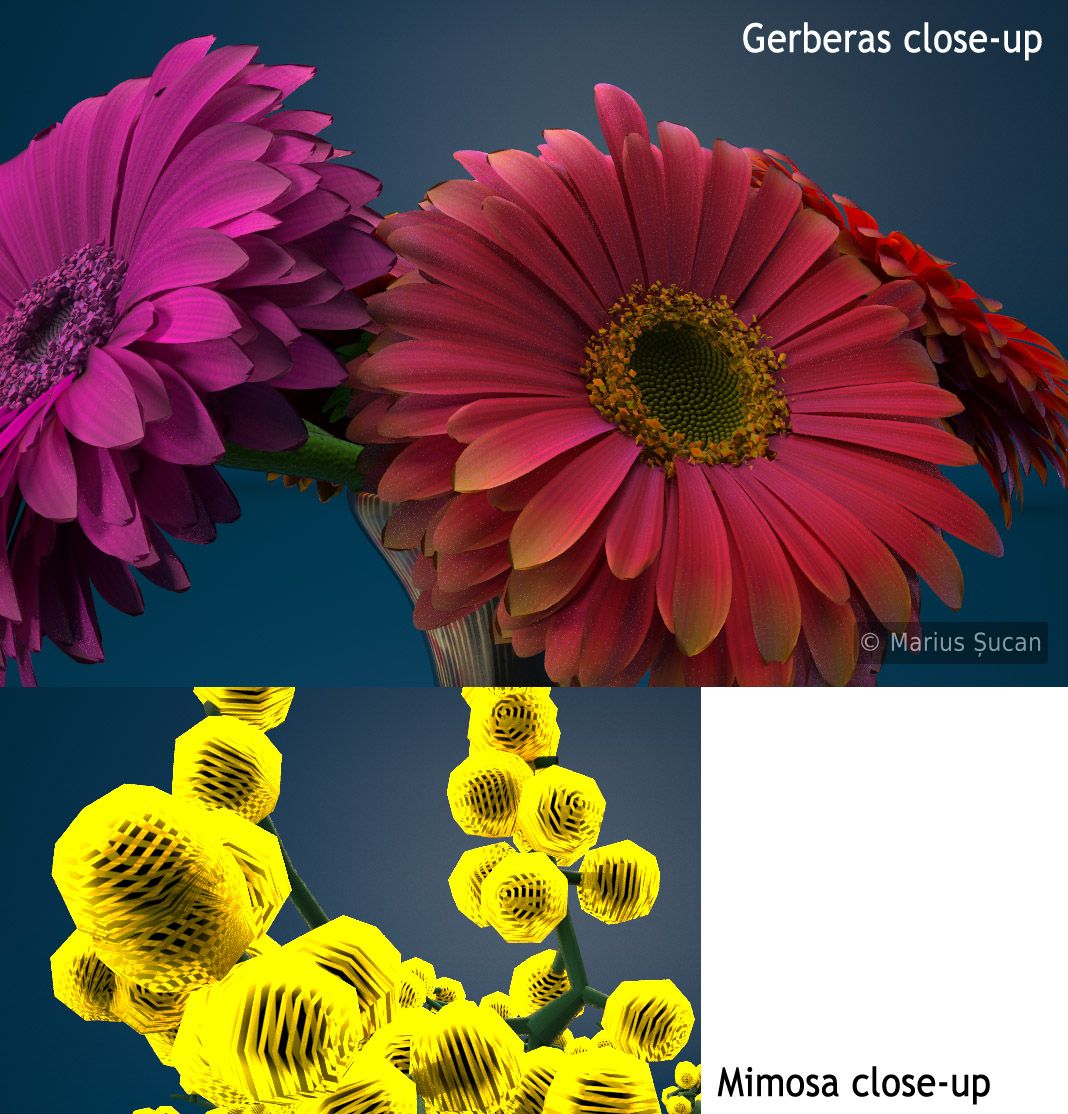
For curiosity, I also rendered close-ups of the blossoms:
The only exceptions, which I really have to mention, are the shaders for the vases. The big glass vase, on the piano, has perhaps one of the slowest rendering shader, because it has: a bump channel, a reflection channel, 4 specularity channels, a diffuse channel, the refraction channel with volume and SSS on, and finally, SPD. Luckily, in each channel, there are relatively simple shaders, but still, it renders hellishly slow. Here's a work in progress image:
![The vase with SPD [early WIP]](/_astro/vase-wip3.d9c94d3b_267ROp.jpg)
The other vase has a much simpler material. The only special aspect about it is the diffuse channel, where a complex shader with a multitude of stacked layers is to be found. I did my best to reproduce the flames-like patterns found on the real vase.

Other objects


High quality renders

Next page: Light setup
Previous page: Models